Instant Microwave Carrot Cake


Hey guys! Today I’m sharing the fastest little instant cake you have ever seen! It’s not only quick to make but tastes super delicious too!

We don’t always have time to be baking in the kitchen so this recipe helps for those times you need something fast! This time saving little cake is whipped up in literally no time at all! If a craving hits you do you really want to start a long process of baking a treat? Not me on most days! I can easily make this treat and be satisfied in minutes!

The recipe is also healthy and still keeps my wellness goals in mind still. I use healthy ingredients that are easy to find in pretty much anyone’s home. I love using staple ingredients because it just makes life easier. I always try creating recipes that use easy to source items that are regular everyday home pantry ingredients.

Carrots are loaded with nutritional value and they taste great! They have vitamin A (from beta Carotene), Vitamin K, Fiber, Biotin, Potassium, Vitamin B6 as well as many other nutritional benefits. Carrots are great for the skin and hair, boosts immune system, facilitates digestion and is most widely known for improving eye health. They also contain other minerals such as iron, manganese and copper. I feel great about enjoying this dessert because carrots are such power houses of nutrition!

If you wanted to jazz the carrot cake a little and extra calories are no issue then you can also add frosting on top. A yummy maple icing / frosting would work amazing on this recipe. You can add icing sugar in a small bowl with some pure maple syrup. Whisk it and add a tiny amount of plant based milk until you get a nice consistency. This will add such a nice decadent addition! If you make this dessert for a guest I would go with this added option. It will look pretty too! I would also add a sprinkle of cinnamon on top of the icing / frosting for an even prettier presentation.

I know some of you like watching a video version of the recipes so I will add my YouTube recipe video below. Thank you for the support on the channel as well. If you haven’t already Subscribed to the channel then please consider doing so for more healthy recipes!

I love having a comforting cozy warm dessert from time to time. This harsh Canadian winter is becoming too much for me. We have been hitting record cold temperatures this week. It’s just bitterly cold and depressing in general. The warming spices in this cake are a lovely treat and help tremendously. I’m really enjoying a good snuggly blanket and this warm cozy carrot cake lately. It’s becoming our go to recipe!


Instant Microwave Carrot Cake

Dry Ingredients:

1 cup Brown Rice Flour

1 tsp. Baking Powder

Wet Ingredients:

1 cup Plant Based Milk of choice

2 Tbsp. Apple Sauce

5 Tbsp. Shredded Carrot

Dash of Vanilla Extract

Spices:

Sprinkle of Cinnamon

Sprinkle of Nutmeg

Kitchen Gadgets you will need:

1 medium sized bowl

1 mixing spoon

1 small microwave safe baking dish or large wide mug

Grater (for the carrot)

* You can also add Pumpkin Pie Spice as the seasoning for this recipe *


Method:

1. Add all ingredients to a bowl and combine well.

2. Transfer to small Microwave safe baking dish or large wide Mug.

3. Place in the microwave for approximately 3 minutes & 30 seconds. Check on it at the 3 minute mark to see if you need the extra 30 seconds. Keep a close eye on the cake during the whole baking process.

4. Allow to cool off a bit because it will be very hot! You also want the cake to set nicely before digging in.

Enjoy! 💚

Health , Joy & Positive Vibes,

Debbie


Pancake Tuesday!

It's Shrove Tuesday / Pancake Tuesday today!

It’s Shrove Tuesday / Pancake Tuesday today!


It’s Pancake Tuesday, Shrove Tuesday or Fat Tuesday … whatever ya wanna call it it’s fine by me! If you’re not familiar with it then just click on Shrove Tuesday & Fat Tuesday and the links will fill you in. As per tradition I made pancakes for my kids to enjoy this morning. I put together some super fast and easy pancakes while packing school lunches and getting my crew out the door on time. I made super Cinnamon vegan pancakes and Cinnamon & Blueberry pancakes as per my 9 year old’s request. When I’m in a big hurry (like today) I use a premixed flour pancake mix sometimes which contains healthy whole grains like brown rice, teff, spelt and quinoa flour. I like having a bag of the premixed flour handy but they sometimes contain sugar and I prefer sugar-free options. To sweeten my pancakes I’ve only been using sugar-free powder stevia and I love the results! I find the liquid stevia way too bitter in taste however so I stick to the powder form. That way the only sugar we are actually putting on our pancakes is the 100% natural Canadian maple syrup and the natural sweetness from the berries. I sometimes skip the maple syrup and just add a touch of pure organic coconut oil on top as an even healthier alternative … yea bring on the yummy good fats! Below is the in a rush on a school day recipe I used this morning 🙂


CINNAMON / BLUEBERRY CINNAMON PANCAKES


Ingredients:

  • 1 cup of your favourite flour mix
  • 1 tsp. aluminum free Baking Powder
  • 1/4 cup filtered water
  • 1/3 -1/2 cup unsweetened almond milk
  • 1 melted tbsp. of coconut oil
  • 3 packets of stevia
  • 3 tbsp. flaxmeal mixed with 9 tbsp. of water, let sit for a couple of minutes to thicken up
  • 1 tbsp. cinnamon, or to taste
  • 1 pint of blueberries, I usually save some for garnish on top
  • You will also need vegan butter or coconut to coat your pan for cooking


Method:

  1. Mix your flaxmeal with water and let it sit.
  2. In a medium-sized bowl add the flour, baking powder, cinnamon, and stevia. Mix well.
  3. Heat a frying pan with a vegan butter or coconut oil
  4. In a small bowl add the water, milk and the coconut oil and mix well. When adding the milk add in 1/3 cup and you can add more if needed afterward.
  5. Add the wet ingredients into the dry. Add in extra milk if you find your batter is too dry. Also add in the flaxmeal as well and combine. Don’t over mix however or your pancakes wont be as fluffy.
  6. Transfer the pancake mix to your preheated frying pan or griddle. They cook up fast so keep an eye on them.


NOTE:

  • As far as the blueberries go I usually add them in to my batter once I’ve made some plain cinnamon ones as some of my kids prefer them without the blueberries. Then I gently add the blueberries into the batter and cook up the rest.


*This recipe makes about 6 good-sized pancakes so I normally double it.*


Enjoy! 🙂

Healthy Cinnamon Apple Chips!


Healthy Apple Chips!

Healthy Apple Chips!


I love making healthy apple chips! They are a guilt free snack or treat and they are so easy to make! I have found that the best way to slice the apples is by using a mandolin so that they are super thin. If you don’t have a mandolin don’t sweat it, you can just slice them as thin as possible. The thinner they are the faster they will cook. If you use a knife to cut the apple slices just remember to allow some extra time for cooking so they turn out perfect. I like to sprinkle cinnamon op top of my slices but if you’re not a cinnamon fan then just don’t use it. I love cinnamon because of the wonderful flavor it adds but it also helps reduce inflammation in the body.


Apple Chips

Ingredients/things you will need:

  • 1 large baking sheet or 2 smaller ones
  • 1 tbsp. Coconut oil
  • Cinnamon
  • Apples (I use 4-5 organic Gala apples)
  • 1 tbsp. Lemon juice
  • Mandolin or sharp knife
  • Parchment paper
  • Silicone brush


Apple Slices!

Apple Slices!


Method:

  1. Preheat oven to 250 F
  2. I usually use 4-5 Organic Gala Apples when I make apple chips. I use the mandolin to slice them up thinly. Place in a medium-sized bowl.
  3. Squeeze 1 tbsp. of lemon juice on top of the apple slices and give them a careful toss. If you mix them too much they will fall apart so be gentle!
  4. Melt 1 tbsp. of coconut oil
  5. Line 1 large baking sheet or 2 smaller baking sheets with parchment paper.
  6. Add the apple slices to the baking sheet. Try not over lapping them and lay them out in one single layer.
  7. Using your silicone brush you can now lightly brush the apple slices with coconut oil and sprinkle them with cinnamon.
  8. Pop them into the oven for about 45 minutes.
  9. Just continue this process until you have baked all your apple slices.
  10. Allow to cool off once cooked and ENJOY! 🙂

* Visit me on Instagram for more healthy food ideas! My handle is  VeganMommyDee *   🙂

Banana Blueberry Oat Cookies!

Healthy Banana Blueberry Oat Cookies!

Healthy Banana Blueberry Oat Cookies!


My recipe for Banana Blueberry Oat Cookies only has 4 ingredients in them …yes only 4! I want to be able to enjoy a cookie or treat without all the guilt associated with it, which is one of the reasons why I like to come up with my own recipes. The other reason is I strive to eat healthy on a daily basis. I want to be able to eat a cookie that only contains a few ingredients not chemical sugar loaded junk that’s found on super market shelves! These cookies have no added sugar in them! The bananas add enough sweetness so I don’t add any extra sugar to them. I’ve been trying to stick to sugar free snacks now and I’ve also been experimenting with stevia as an alternative. I’m also on a fitness quest so it’s important to for me to not set myself backwards by eating unhealthy treats. These simple cookies are so easy to take on the go too which is super handy when the hunger bug hits ya and all you have around you is junk food/fast food. They are very helpful to me when my daughter is at glee club and dinner time is approaching. All they have in the community center are vending machines full of junk! Tempting at times but no thanks I’ll just enjoy a healthy banana blueberry oat cookie instead! 🙂


Banana Blueberry Oat Cookies 


Ingredients:

  • 1 cup gluten free old fashion rolled oats (I use Bob’s Red Mill organic brand)
  • 2 organic mashed banana
  • 1 tsp. cinnamon, or to taste
  • 1/3 cup blueberries


Method:

  1. Preheat oven to 325 F
  2. Line a baking sheet with parchment paper
  3. Mash the two bananas in a medium sized bowl
  4. Add the oats and cinnamon. Combine really well.
  5. With a spoon scoop out the mixture and place on the baking sheet to make your cookies. Make them whatever size you prefer and top each cookie with desired amount of blueberries.

Note:

*  You can also gently add the blueberries into the mixture before you scoop it out to make your cookies. I don’t prefer to however because I think they look pretty topped with the blueberries and I don’t risk breaking them in the batter. *

* These quantities made 9 cookies for me*


Enjoy! 😀


Banana Oat Breakfast Bites with Cranberries & Walnuts

One of my favourite things to whip up are these easy to make Banana Oat Breakfast Bites!!! Many people make similar cookie versions to this recipe but the great thing is that everyone can make it their own way using ingredients that work for them. The great thing about this recipe is that you can tailor it to your own tastes and preferences! I find that they are a great idea for a fast breakfast when you’re in a hurry which really saves time. Have them with a healthy green smoothie and your good to go! I always have organic bananas on hand as well as oats so this recipe is made very often in my home. I also add dried sulfate free cranberries and walnuts sometimes too. The recipe I’m posting will be this version. 🙂 My kids like my vegan chocolate chip version best of course but then they are a treat and no longer a super healthy breakfast bite! LOL  You can also make them into cookies if you want but I like making mine smaller so that’s why I call them “bites”. I find that they are the perfect size to pop into a little container and pack them into a lunchbox or throw into a purse. They are a great on the go healthy snack. I always make sure I have healthy snacks in my purse because I’m vegan and it’s not always easy to find healthy vegan snacks on the go. Hey non vegans you should definitely be trying to bring healthy homemade snacks with you so you’re not tempted to buy sugary & fat filled treats while your on the run too!


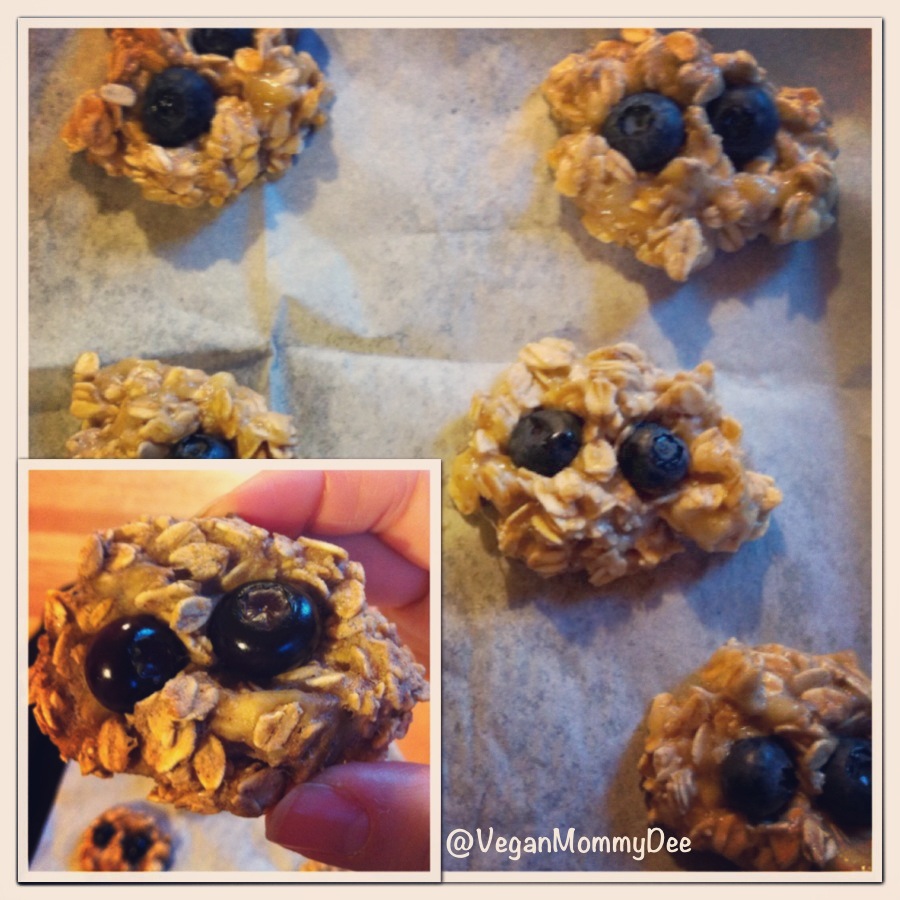
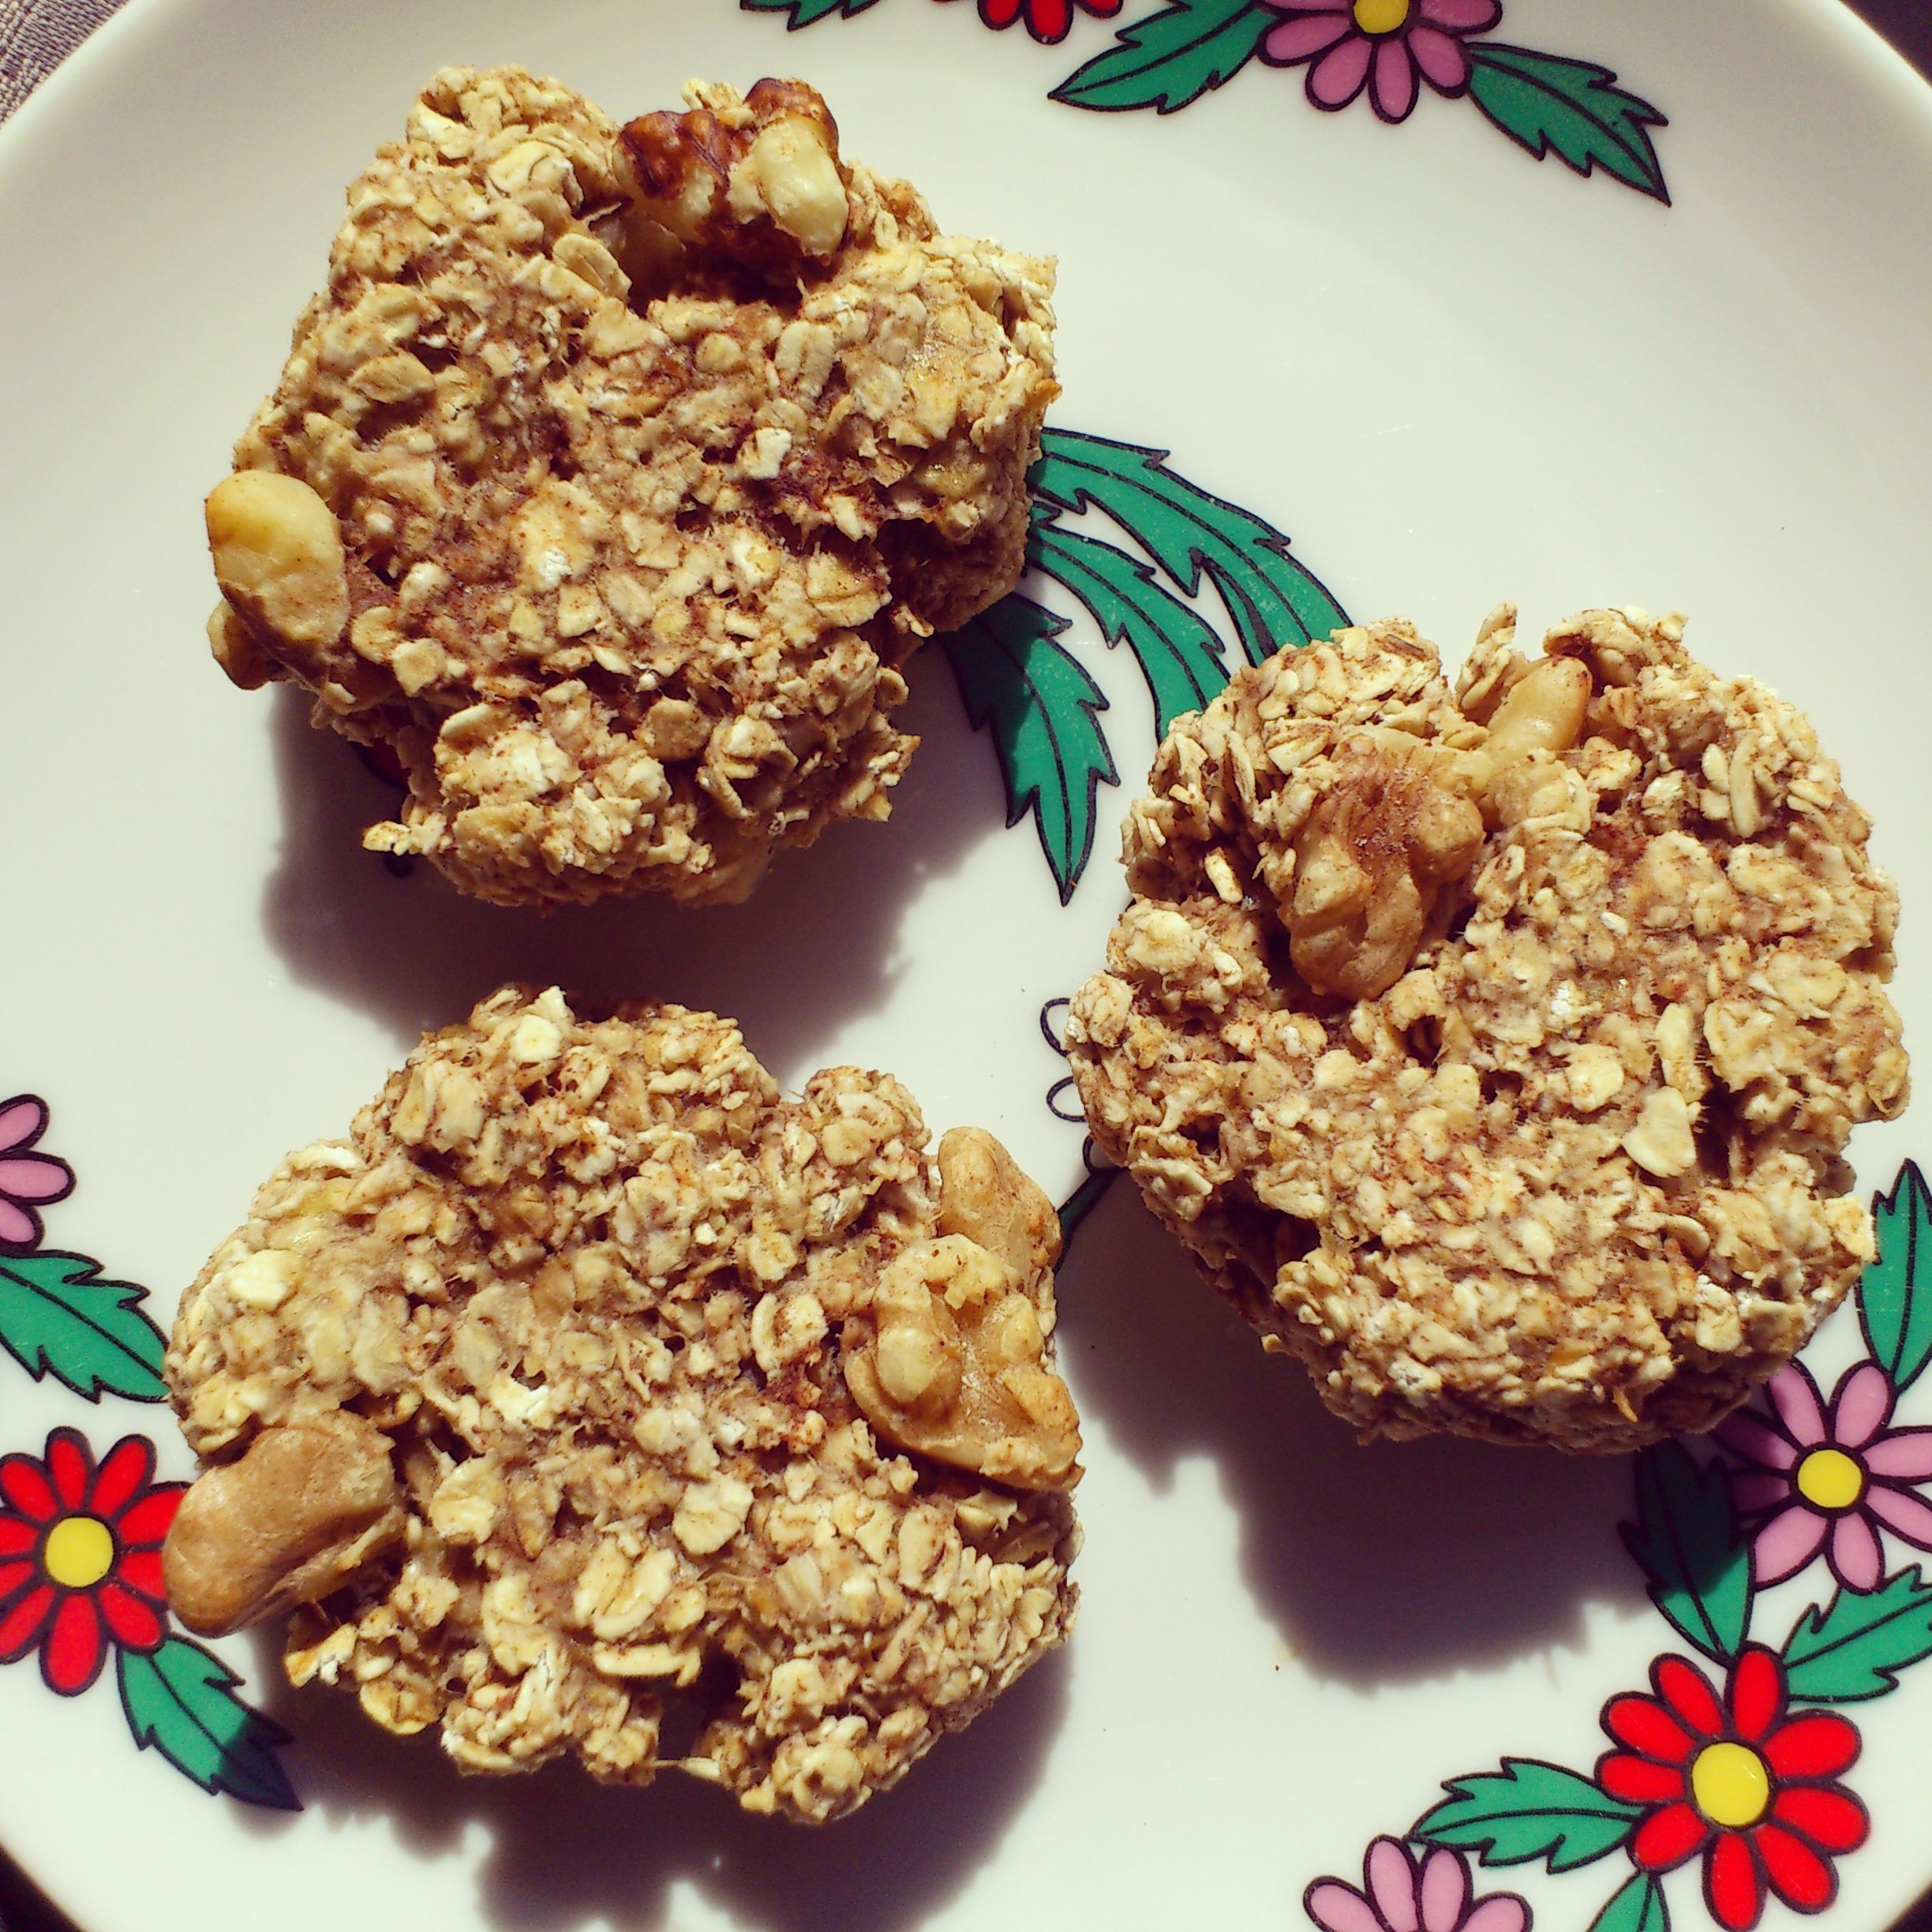
Banana Oat Breakfast Bites with Cranberries & walnuts

Healthy Breakfast Bites

Healthy Breakfast Bites


Ingredients:

  • 2 regular sized Bananas
  • 1 TBSP Cinnamon
  • 2 cups Oats
  • 1  1/2 tsp. pure Vanilla extract
  • 1 TBSP Sulfate free Cranberries
  • Handful of chopped Walnuts


Method:

  1. In a medium-sized bowl mash both bananas with a fork really well.
  2. Add the vanilla and mix.
  3. Throw in the 2 cups of Oats and the 1 TBSP of Cinnamon. Combine well.
  4. Now you can go ahead and add the cranberries and walnuts. Give it another good mix.
  5. Shape into small round balls and place on a lined cookie sheet. Flatten the balls down slightly with the back of a teaspoon.
  6. Pop them into the oven for 10 minutes. If you want to make them bigger or into cookies then they will bake between 12-14 minutes.
  7. After removing them from the oven let them cool down on the pan. Transfer them to an airtight container once they have cooled off.


Other Versions of my Banana Oat Breakfast Bites:


Vegan Chip: My kids favourite version has 1/3 cup vegan chocolate chips thrown into the banana and oat mixture. They are such a tasty treat!

Plain Banana & Oat: I also make these banana bites without adding any dry fruit and nuts and they turn out great as well. Simple and super fast!

Protein Boost: I also make a version of these breakfast bites with peanut or almond butter added to the oat mixture! YUM! Just add 2 TBSP nut butter to your mixture. Be sure to combine it well  I bake them 10-12 minutes depending on their size. *I omit the cinnamon, chopped nuts and dried fruit for this version.*

Coconut & Almond: Toss in a handful of chopped almonds as your nut for these banana bites and instead of adding the cinnamon I throw in 1 TBSP of shredded coconut in it’s place.


*ENJOY your yummy & fast to make Banana Breakfast Bites! Have fun with them and try out different combinations to suit your needs*


*Makes 12-15 Banana Bites depending on their size*

My Coconut Rice Pudding

I adore rice pudding so once in a while I seriously crave some! I used to make my rice pudding using only almond or soya milk but once I tried making it with some coconut milk I revamped my recipe. Oh my gosh the coconut milk adds such a lovely flavor! This is my idea of feel good comfort food especially during the cold winter months. This recipe is actually my 8 year old’s favourite one and she get’s super excited when she sees that it’s cooking away on the stove top. It’s funny how such simple things can make a kids day! 🙂

Coconut Rice Pudding

Coconut Rice Pudding

Ingredients

  • 3/4 cup Arborio rice
  • 1 can of Coconut Rice Pudding
  • 4 cups Almond Milk or just use the coconut milk can and fill it twice
  • Cinnamon
  • 1 tsp pure Vanilla
  • Pure Maple Syrup (I only add 1 TBSP)

Method

  1. In a medium-sized pot add the can coconut milk and almond milk. Bring to boil at medium heat. Keep an eye on your pot because in the blink of an eye it will boil over and create a crazy mess on your stove top!
  2. When the milk is boiling add the rice, vanilla and desired cinnamon. Mix well. Bring the heat down to low or a simmering heat.
  3. Boil for 45 minutes – 1 Hour. Stir often throughout so the rice doesn’t stick to the bottom of the pot.
  4. I like adding the maple syrup during the last 10-15 minutes of cooking and then mix well.
  5. Transfer to serving bowls and sprinkle a little cinnamon on top before serving.
  • I haven’t put in a certain amount of cinnamon because I add A TON into my rice pudding. Everyone’s taste is different so you can add what ever amount you think is best.
  • I added 1 TBSP of Maple Syrup to my pot of rice pudding. You can add more if you like your pudding sweeter! I prefer adding only 1 TBSP and then if people want it sweeter then a little more can be added to only their serving.


NOTE:

* It seems that I live with some MAJOR Sweet Toothed people! They said they prefer when the rice pudding is sweeter! They added between 1 tsp and 1 tbsp to their bowls of pudding!


That’s it! It’s crazy easy and so incredibly yummy!!!  So ENJOY!

Granola Coins

These granola coins are so easy to make and are so handy to have in the house.  I throw them into my purse in case I need a snack on the go.  I found a recipe in Today’s Parent but had to change it up to suit my vegan needs. The original recipe called for eggs so I use flaxmeal in my recipe. I also added shredded coconut to my recipe as well because I think it add’s incredible flavor and texture to the coins.  Another change to the original recipe is that I added cinnamon too! We LOVE cinnamon! Making this recipe really got me thinking about other combinations I can make as well. I will be trying out some different ideas before my kids head back to school.  Sadly summer holidays are almost over. I’m starting to think of new easy to make snacks that the kids would be able to take to school. I think that these granola coins would be a great snack to throw into their lunch boxes! They are super yummy and very healthy for them too!

Granola Coins

*You will need a muffin tin for this recipe*

  • 3   TBSP  Flaxmeal
  • 7-8 TBSP Water
  • 1 TBSP Vegetable oil or coconut oil
  • 1 cup oats
  • 2 TBSP Pumpkin seeds
  • 1 TBSP Sesame seeds
  • 2 TBSP Shredded coconut
  • 1/4 cup dried cranberries
  • 1/4 cup 100% pure Maple syrup
  • Cinnamon to taste … I add at least 1 teaspoon to mine 🙂
  1. In a small bowl add the 3 TBSP of Flaxmeal with 7-8 TBSP of water. Add 7 and if it’s still a tad dry add more water. Mix well and let sit for 5 minutes.
  2. Preheat oven to 350 F (180 C).
  3. In a medium bowl add maple syrup and oil. Mix.  
  4. Stir in the oats, pumpkin seeds, cranberries and sesame seeds, cinnamon, shredded coconut and add the flaxmeal.  Give it a good mix.
  5. Coat your muffin tin with coconut or veggie oil
  6. Add the granola mixture into the muffin tin, dividing it equally.
  7. Use the back of a teaspoon to press the mixture firmly down into the muffin cup.
  8. Bake at 35o F  for about 12 minutes
  9. Let the coins stay in the muffin cups for at least 5 minutes after taking them out of the oven. This will let the shape fully set.
  10. Transfer to a storage container

* Makes 12 granola coins *

Apple Cinnamon Muffins

These muffins are really tasty and very easy to make! They are also pretty fast to whip up which is a total bonus! I’m usually baking with my kids so I try to keep recipes pretty simple and fast to make. My new baking buddy is my 5 year old who is pretty darn good at it actually. She is also now at an age where she understands that  mommy doesn’t use any animal ingredient’s, so we are always putting in alternatives into our recipes. She even knew that we used flax in this recipe instead of eggs. I guess kids do pay attention to their parents!

Apple Cinnamon Muffins


  • 2 cups spelt flour or brown rice flour
  • 1/3 cup cane or sugar of your preference
  • 1 tbsp ground flax (flax meal)
  • 3 tbsp of water
  • 1 cup almond milk
  • Pinch of Himalayan salt
  • Cinnamon to taste
  • 2 tsp baking powder
  • 1 1/2 cups peeled & chopped apples ( I use Gala )
  • 1/4 cup vegan butter, coconut oil or veggie oil

(Optional) Topping: 1 tbsp of cane sugar mixed with 1/2 -1 tsp of cinnamon

Preheat oven to 400 F. In a little bowl put the 1 tbsp of the flax meal (ground flax) and add 3 tbsp of water to it. Mix & let stand for a few minutes. Cream together the sugar and butter. Add in the flax and mix well. In a large bowl add the spelt flour, salt, baking powder and cinnamon. Mix well. Add wet ingredients to the flour mixture and mix well. Add in the chopped apples and give it a quick mix. Line your muffin tray with paper liners and fill them up with the yummy mixture. If you’re using the topping then sprinkle a touch of it on each muffin. Pop them into the oven and bake them for 20-25 minutes or until golden brown.


*Makes 1 dozen muffins*

Image