Banana Blueberry Oat Cookies!

Healthy Banana Blueberry Oat Cookies!

Healthy Banana Blueberry Oat Cookies!


My recipe for Banana Blueberry Oat Cookies only has 4 ingredients in them …yes only 4! I want to be able to enjoy a cookie or treat without all the guilt associated with it, which is one of the reasons why I like to come up with my own recipes. The other reason is I strive to eat healthy on a daily basis. I want to be able to eat a cookie that only contains a few ingredients not chemical sugar loaded junk that’s found on super market shelves! These cookies have no added sugar in them! The bananas add enough sweetness so I don’t add any extra sugar to them. I’ve been trying to stick to sugar free snacks now and I’ve also been experimenting with stevia as an alternative. I’m also on a fitness quest so it’s important to for me to not set myself backwards by eating unhealthy treats. These simple cookies are so easy to take on the go too which is super handy when the hunger bug hits ya and all you have around you is junk food/fast food. They are very helpful to me when my daughter is at glee club and dinner time is approaching. All they have in the community center are vending machines full of junk! Tempting at times but no thanks I’ll just enjoy a healthy banana blueberry oat cookie instead! 🙂


Banana Blueberry Oat Cookies 


Ingredients:

  • 1 cup gluten free old fashion rolled oats (I use Bob’s Red Mill organic brand)
  • 2 organic mashed banana
  • 1 tsp. cinnamon, or to taste
  • 1/3 cup blueberries


Method:

  1. Preheat oven to 325 F
  2. Line a baking sheet with parchment paper
  3. Mash the two bananas in a medium sized bowl
  4. Add the oats and cinnamon. Combine really well.
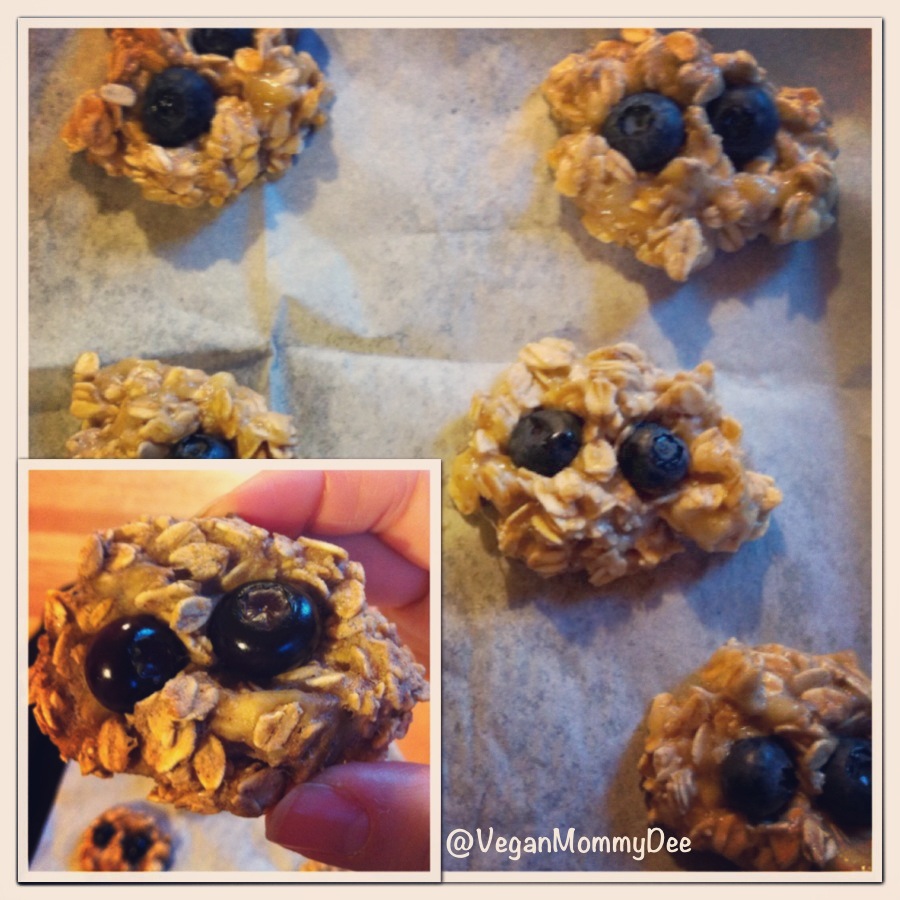
  5. With a spoon scoop out the mixture and place on the baking sheet to make your cookies. Make them whatever size you prefer and top each cookie with desired amount of blueberries.

Note:

*  You can also gently add the blueberries into the mixture before you scoop it out to make your cookies. I don’t prefer to however because I think they look pretty topped with the blueberries and I don’t risk breaking them in the batter. *

* These quantities made 9 cookies for me*


Enjoy! 😀


~ Chocolate Mousse Pie ~

Chocolate Mousse Pie!

Chocolate Mousse Pie!

This pie is so easy and fast to make so it’s now become my go to dessert. It’s made with simple ingredients that I always have on hand. To save time I usually buy a vegan already pre made graham cracker crust but a simple nut & date crust would also work really well. Depending on how sweet you like your desert you will need to adjust the agave/maple syrup to suit your taste. I’d like to try my recipe using stevia as a sugar-free alternative. When I do I’ll update you on how that turns out! It doesn’t hurt to try right? 🙂

*My apologies everyone. I posted the recipe originally without proof reading very well and I missed a crucial ingredient! THE DATES!!! Don’t forget those!*

Ingredients:

  • 3 large avocados
  • 1 cup unsweetened cocoa
  • 1/2 cup agave
  • 1/3 cup unsweetened almond milk
  • 1/3 cup pure maple syrup
  • 1  pre-made graham cracker pie crust/shell
  • 1/2 tsp. pure vanilla extract (optional)
  • 1/2 cup medjool dates

Method:

  1. Add the dates to a bowl and soak them in warm water for 10 minutes to soften up.
  2. In a food processor add the dates (pitted), avocado, cocoa, almond milk, vanilla, agave and maple syrup and combine very well. If you are finding it a bit too dry then add a touch more milk to the mixture.
  3. Add the mixture into your pre-made pie shell and smooth it out.
  4. Place in the fridge to set. I find that it is best to make it the day before so the chocolate moose firms up slightly. It’s easy to slice up once set properly.

*I add Christmas sprinkles on top during the holiday season which makes the pie look really nice. My kids also like to drizzle peanut butter on top of their slices which tastes amazing!*

Enjoy!

Christmas Chocolate Mousse Pie!

Christmas Chocolate Mousse Pie!

Chocolate Muffins with Mini Chocolate Chips!

Chocolate Muffins

My kids are really picky and I’ve made many chocolate muffins but this is the favourite in my house! So now that I created a recipe that’s finally a hit with everyone I’m sticking to it! No more playing around with ingredients anymore when it comes to chocolate muffins/cupcakes in my house! LOL These muffins are really fast to make and have very simple ingredients. Sometimes the simpler recipes create the best outcome!

I want to mention that depending on the flour that you choose to use you may need to use a little more milk in the recipe. If you find it a little too dry then add 1 tbsp. more milk at a time. I tried to cut the sugar down in my recipe but that didn’t work out so well with my taste testing crew over here. Ugh! So it’s best to use 1/2 cup for best results. In order to make myself feel better I only add a few mini chocolate chips on top of each muffin instead of adding them into the batter. I cut down on sugar in that sense and the kids didn’t notice. Hey sometimes you have to be a little sneaky if it’s for their best interest right? 🙂

Here is my super easy and kid approved recipe …

CHOCOLATE MUFFINS WITH MINI CHIPS

* Makes 12 Muffins*

Ingredients:

  • 1 1/2 cups flour, I usually use brown rice flour or spelt flour. I’ve also used a mix of regular unbleached flour and brown rice flour and it worked really well.
  • 2 tsp. baking powder
  • 1/3 cup veggie or coconut oil
  • 1/4 cup cocoa powder, you can add more if you like a stronger chocolate taste.
  • 1/2 tsp. pure vanilla extract
  • 3 tbsp. flaxmeal
  • 6 tbsp. water
  • 1 cup unsweetened almond milk. Depending on the type of flour you use you may need up to 1/4 cup extra as some flours draw in the moisture more than others.
  • 1/2 cup coconut sugar
  • Handful of vegan mini chocolate chips

You will need:

  • 3 mixing bowls: 1 large, 1 medium & 1 small
  • 1  muffin tin (for 12 muffins)
  • 12 paper muffin liners

Method:

  1. Preheat oven to 400 F
  2. Add your flaxmeal to a small bowl and add 6 tbsp. of water to it. Mix and set aside for a few minutes until it thickens up a bit.
  3. Line your muffin tin with paper liners.
  4. Add flour, baking powder, cocoa and sugar into the large bowl and combine well.
  5. In your medium-sized bowl add milk, oil, vanilla and flaxmeal mixture. Mix well.
  6. Add your wet ingredients into your dry ingredients and combine. Don’t over mix. Add in a little extra milk if needed.
  7. Scoop up the batter and fill up your muffin tin.
  8. Top each muffin with some vegan chocolate chips.
  9. Pop them into the oven for 20 minutes.
  • Once baked allow to cool off in the muffin tin. Transfer to an air tight container.

* If you wanted to make cupcakes with this recipe then just add the mini chips to the batter instead. Once baked allow them to cool off completely and then ice them. Place them in the fridge for a bit to allow your icing to set nicely*

Enjoy! 🙂

muffins

Chestnut Love!

Chestnuts!

Chestnuts!

 
I look forward to this time of year not only because I’m a Christmas-a-holic but I also LOVE Chestnuts! I grew up eating them and they bring back so many great memories. Memories that mostly contain my wonderful grandfather who was like a second father to me. He passed away 11 years ago and I still miss him terribly. I do however have these awesome memories and I truly cherish them.

As per Portuguese custom my grandmother would boil the chestnuts and my grandfather would peel them for me. Yep I had the life eh? 🙂 YUM! I now prefer to roast my chestnuts these days. They are so easy to peel once roasted too which my kids really appreciate! Chestnuts are super fast to cook up and they are a fantastic snack to have this time of year. They are low in calories, have protein, minerals, vitamins, are gluten-free and contain less fat than other types of nuts. They are rich in vitamin C and 100 g provide 43 mg of vitamin C!

Here is how to make this tasty & healthy snack …


Roasted Chestnuts

  1. Preheat your oven to 400 F
  2. Line a baking pan/cookie sheet with a piece of parchment paper
  3. Cut a slit into each chestnut so that the steam can escape when your roasting them. Use a small sharp knife or a chestnut cutter. Don’t skip this step or else your chestnuts will explode in your oven!
  4. Pop them into your oven for 20 minutes.


Enjoy! 🙂

* Below is a picture of the chestnut cutter if you’re not sure what it looks like. I’ve wanted one for years but never bought one. This year I finally treated myself to one! The one I’ve pictured is the one I bought but many different types are available to choose from. *

chestnut cutterchestnut cutter


Blueberry Protein Smoothie

Blueberry Protein Smoothie!

Blueberry Protein Smoothie!


Blueberry Protein Smoothie

  • 2 cups blueberries (I use frozen most of the time)
  • 1 cup chopped cantaloupe
  • 1 scoop vegan vanilla protein powder
  • 1 cup lettuce of choice
  • 2 large peaches, chopped up
  • 2 cups cold filtered water
  • 1/3 cup chopped parsley (optional)
  • Ice (optional)


Add the lettuce, blueberries, peach, parsley (if you’re using it), protein powder, cantaloupe and water to a blender. Blend well to desired consistency. Adjust water if you think you need to add a bit more. Add in some ice if you want your smoothie colder & blend well.

Enjoy! 🙂


*Below are some of the reasons why I use parsley in my cooking but also in some of my smoothies as well!*


Health Benefits Of Parsley!

Health Benefits Of Parsley!


Mixed Greens

Mixed Greens


blueberries


My daughter holding a perfect yummy organic peach!

My daughter holding a perfect yummy organic peach!


Green Breakfast Smoothie with Chia!

Green Chia Smoothie


This is one of my favourite smoothies to whip up for breakfast! Fast to make, it has simple ingredients and then it’s topped with some healthy chia!!! I use a super huge mug for this baby when I make it! 🙂


  • 1 large handful of spinach
  • 1 1/2 frozen bananas
  • 1 cup frozen mixed berries
  • 2 cups unsweetened almond milk
  • 1-2 tbsp. chia seeds (for topping)
  • a few frozen blueberries (for topping, optional)
  • a few large ice cubes if you want your smoothie to be colder (optional)
  • 1 tsp. Spirulina


Toss spinach, almond milk, mixed berries, spirulina and ice cubes if you’re using them into a blender. Once it’s at the consistency your happy with pour into your large glass or huge mug like I do. Top with 1-2 tbsp. of chia seeds and frozen blueberries.


Enjoy your energy booster breakfast smoothie! 🙂

Garlicky Mushroom Phyllo Triangles!

 Ok these are seriously delicious!!! Mushrooms and garlic go together insanely well as we all know so I thought they would be great for this recipe. I’ve wanted to try working with phyllo for a long time but was too intimidated to. I finally tried yesterday for the 1st time and it actually went pretty darn well! I’ll be making these very often now! I’m also going to try cutting down on the amount of butter used next time I make them. Although I didn’t use an excessive amount of butter in my recipe I think I could probably cut it down even further without jeopardizing the taste.

I bet these would be great with other filling options as well. I plan on creating some other options soon. My youngest daughter is super picky with her veggies but does enjoy broccoli. I will be making a broccoli filling along with this wonderful mushroom mixture next time. There are so many possibilities and I plan on creating many different options!

This recipe would be fantastic served as an appetizer during this holiday season for those of you who are entertaining your friends & family. This will definitely be on our Christmas menu at our house. 🙂


Garlicky Mushroom Triangles


Garlicky Mushroom Phyllo Triangles


You will need:

  • 1 package of phyllo dough
  • About 2 tbsp’s. melted vegan butter
  • large sharp knife
  • parchment paper
  • 1 baking pan/cookie sheet
  • 1 package of mushrooms, chopped into small pieces
  • 3-4 cloves of garlic, minced
  • Himalayan pink salt and black pepper, to taste
  • small frying pan
  • 1 tbsp. olive oil
  • small plate
  • Small pastry brush


Method:

  1. Add the 1 tbsp. of olive oil to your pan and toss in the minced garlic into it. Sauté it for a minute on a medium/low heat setting.
  2. Next add in your mushrooms and salt and pepper. Sauté them for about 5 minutes until softened at a medium heat. Set aside.
  3. Preheat oven to 350 F and line the cookie/baking sheet with a piece of parchment paper.
  4. Unroll your phyllo dough and using a sharp knife cut 2, approximately 10cm strips. Then you are going to cut each strip in half.
  5. On the small plate your going to add 3-4 pieces of your phyllo squares and lightly brush a little bit of vegan butter on top. You only need a tiny bit of butter! Don’t over do it!
  6. With a spoon scoop a bit of your mushroom mixture onto your phyllo piece. Then shape it into a triangle and seal it shut.
  7. Transfer to your cookie sheet/baking pan. Continue to make more triangles using your phyllo and mushroom mixture.
  8. Once your baking pan is full then lightly brush a tiny bit of the butter on top of each one.
  9. Bake for approximately 18 minutes. Keep an eye on them as ovens vary in temperature.


These went very fast in my house! Next time I will be doubling the recipe! I hope you enjoy them as much as we did. 🙂

* These made approximately 15 triangles*

~Debbie~


Garlicky Mushroom Phyllo Triangles


Baked Mushroom Triangles

Baked Mushroom Triangles


My baked Garlicky Mushroom Phyllo Triangles!

My baked Garlicky Mushroom Phyllo Triangles!


Breakfast Green Smoothie!

I always enjoy a yummy breakfast smoothie daily. It’s the perfect way to add extra greens into our diets! I love creating new smoothies and trying different combinations of fruits and veggies. This recipe is very easy and fast to whip up so it’s perfect for hectic mornings!


Breakfast Green Smoothie

  • 1 frozen banana
  • 1 tightly packed in cup of spinach or mixed greens of choice
  • 2 1/2 cups filtered water
  • 1/2 cup chopped cucumber
  • 1 large peach, sliced
  • 1  scoop of vegan protein powder
  • 1 tsp. Spirulina


Toss everything into your blender and liquefy. Check consistency and add a bit more water if needed as some protein powders thicken smoothies up more than others.

Enjoy!


Green Smoothie


My Raw Vegan Pumpkin Pie!

I’m finally posting the recipe for my Raw Vegan Pumpkin Pie !!! Many people have asked me for this recipe so here it is! It’s super easy to make and so far everyone who has tried it has loved it! When I cook and bake I pretty much always just eyeball the quantities of my ingredients. Not good when your being asked for your recipes often! I’ve now forced myself to pay attention to the quantities and write down my recipes as I go. This recipe is easily adapted so adjust the spice amounts as desired. Everyone is different. Some people like their pie mild in flavor and others like it strong. I’m kinda of a mid range person and that’s what my recipe reflects. As far as nuts go I prefer to use raw cashew halves in my pie filling as well as the crust. I’ve done it with walnuts and it turns out good in flavor but I find the texture of the pie is much better when I use cashews. So although Thanksgiving has already passed for us in Canada I still made another raw pumpkin pie this week. Hey it’s still fall so I think it’s still appropriate! For my lovely American friends & family this recipe is coming to you in perfect timing! Your welcome! 🙂


My Raw Vegan Pumpkin Pie


RAW VEGAN PUMPKIN PIE


Ingredients for the crust:

  • 1 cup raw cashew halves (no need to soak the nuts for the crust)
  • 1 tbsp. unsweetened shredded coconut
  • 2 medjool dates, pitted


Ingredients For the pie filling:


  • 1 1/2 cup raw soaked and drained cashew halves
  • 1/2 cup pure maple syrup or agave
  • 1 1/2 cups pure pumpkin puree (Not pumpkin pie filling!)
  • 1/2 tsp. pure vanilla extract
  • 1 heaping tbsp.’s cinnamon, or to taste
  • 2 tsp. pumpkin spice, or to taste
  • 3 heaping tbsp.’s coconut oil
  • 10 medjool dates, pitted


You will also need:

  • 1 pie plate or desired dish
  • food processor
  • large bowl
  • medium-sized bowl
  • kettle


* For best results soak your cashews over night!!! Add the 1 1/2 cups raw cashew halves into a large bowl and cover with water. Give it a quick mix and leave them overnight on your countertop. *


Method:


  1. Place the dates in a medium-sized bowl and add boiled water to them from your kettle. Let them sit there 10-20 minutes to soften up.
  2. After your dates have softened you can remove 2 from the bowl and after pitting it add it to the food processor. Your now going to make your pie crust. Add in the 1 cup of raw cashews and the 1 tbsp. of shredded coconut. Use the pulse option in order to just combine the ingredients slightly. I then use the low setting on my food processor to combine the ingredients well.
  3. Remove the crust ingredients and add them to your pie plate. Use your fingers to press down the mixture and spread it out evenly. Set aside.
  4. Remove the other 10 dates from the water and remove the pits. Add them to the food processor.
  5. Strain the water out of your 1 1/2 cups cashews and add them to your food processor as well.
  6. Add in the 1 1/2 cups pure pumpkin puree, 1 heaping tbsp. cinnamon, 2 tsp. pumpkin spice and the 1/2 tsp. pure vanilla extract.
  7. Next add the 3 heaping tbsp.’s of coconut oil
  8. Pulse to just chop everything slightly and then use the high-powered option and blend well. I stop mine and use a spoon to scrape down the sides of the processor a couple of times in order to make sure that the nuts puree well.
  9. It should be a beautiful smooth consistency. Taste and adjust the spice as needed at this point.
  10. Transfer the pie filling into your pie plate. Smooth it out evenly and cover it up with clear cling wrap.
  11. Pop it into the freezer for at least 4- 6 hours until it’s set and firm. Once it’s set really well you can place it into the fridge. Take the pie out a few minutes before your going to slice and serve it so that it comes to room temperature.


* I’ve also been known just kept my pies in the freezer and only cut the slices I need. I let them come to room temperature and serve them.  My kids enjoy adding whipped cream on top of their pie slice but I eat mine plain. I think it’s perfect just like that!  🙂


Enjoy!


Raw Vegan Pumpkin Pie