The Summer can be a very busy time for most people. If your a parent then the kids are off school and your usually in a rush while entertaining them on the go. It can also get busy because of all the family & friend get togethers that usually happen quite often during the summer. All the temptation of goodies with either overwhelm you or you will arm your self with other options. Hopefully you can motivate yourself to not take too many steps backwards & stay on the HEALTHY and FIT TRAIN despite all that’s going on around you!
Its so important to start your day off on a good note. That means providing your body with the nutrients it needs! Eat a healthy breakfast or drink a nutritious shake. This will set the tone for your day. Start your day off drinking lots of water as well. Starting your day off on a positive note will encourage you to make healthy choices later on during the day!
Prepare your workout for the day according to what your plans are. Use an app to keep it organized, your notes or even an old school book like me to jot down new workouts or exercises you wanna try. If it’s an outdoor play day with the kids then plan an outdoor workout that you can accomplish. Walking is also great when you simply can’t fit in anything as well. This is why having the Beachbody In Demand is wonderful because you can use it right on your phone, tablet or computer anywhere you are!
Plan your snacks and food as much as possible! If that’s not possible know where you will be and find out healthier options available for you.
Here’s the wonderful thing about summer … you will get opportunities to stay active that only this season will provide. How about playing on the beach and running around with your kids in the sand. That’s a great workout! Plan fun games with your kids or nieces and nephews which will keep you active outdoors! Take a long hike with a friend and enjoy nature! The list is endless, so just enjoy it. You may not get your typical workout in because your on the go but you will get a chance to step out of the box and find new fitness options which are equally great!

Happy Mother’s Day!
I just wanted to wish all you special mom’s out there a very Happy Mother’s Day!!!
As mother’s we forget to take care of ourselves and live our lives for our children. Today is your special day to relax, go grab a coffee, sleep in or do whatever makes you happy! For me that would be sleep & coffee! Give me those two things and I’ll be the happiest mother on earth. Yep it doesn’t take much to make me happy. My kids also brought home the most wonderful crafts from school which I will cherish as always!
Little Changes, Big Leaps

I’ve had a long health and fitness journey and I’ve pretty much hit every obstacle along the way. My journey still continues as I get closer to my goals and these goals have actually changed along the way. As I’ve accomplished one goal, I’ve set another to strive for. I think I’ve been successful because I’ve always set small goals along the way or implemented small changes in my diet or lifestyle. I’ve found that making small changes are easier to stick to. Once you make these changes and stick to them, this is where habits are made. This is a biggie! Those new healthy habits make a huge impact on your overall health and wellbeing. Not eating past 8 pm for example might be a health change you want to implement but soon that becomes a habit and you no longer feel the need to eat late at night. For me it was making sure I was drinking enough water. That was a huge health change for me. Once I got into that habit I gained energy, cleared my mind and I actually lost some weight as well. Making too many changes all at once or implementing too many restrictions at once will overwhelm you and frustration will cause you to abandon these goals. Smaller more attainable goals will almost always lead you to success.
Ok, so where do you begin if your starting your health journey?
In my opinion these are the staples to keep in mind …
-
Eat Clean
-
Stay Hydrated
-
Exercise Daily
I swear to you that this is the recipe for success! Even if you have very little time in your day, these are manageable goals to set and achieve. So lets break this down a bit so you can see how easy this is.
Eating Clean means that everything that you put in your mouth is going to benefit your body in some way. Will it nurture your body? Will it give you energy? Will it keep you feeling full long so you’re not tempted to hit that local fast food joint? Eat whole foods, fresh foods, foods that DO NOT come from a bloody box! Eat loads and loads of veggies and good quality proteins. Consume good fats like avocado, natural peanut butter and use coconut oil for cooking. I also prefer to consume brown, wild rice and quinoa vs white rice. I just want to provide my body with all the extra nutrients that I can. I don’t like empty calories. Every calorie will be provided to me from quality sources.
Staying hydrated is so vital for our over all health and wellbeing. Drink loads of water! I drink 3 L a day and if I drink less I feel like my mind is in a haze and the energy has been sucked out of me. The more active you are, the more water you need. Replenish what you’ve lost. I fill up a huge water bottle that holds almost 2L of water. I refill it when needed and its a reminder for me because its kept in view. I also keep another bottle that’s always filled on the kitchen table to remind my kids to keep drinking water throughout the day. Sometimes if it’s not in your face, your not going to remember to drink it. Another great way to make sure you remember to stay hydrated is set alarms on your cell phone. That’s a great tool, use it! I would say don’t drink less than 1 1/2 – 2 L per day for optimal health.
Here’s a big one that freaks people out. Exercise daily! That doesn’t mean full-blown workouts daily but any physical activity you can accomplish. It would be optimal to get to the point that you can complete a workout a day, even if it’s a short one. Baby steps though. Work up to that point. Even long walks are an awesome way to stay active and connect you to nature. That’s a WIN-WIN in my books! I’ve been known to take two-hour walks with the baby and I feel fantastic after!
If I can implement these small health choices into my life, then you can totally do it too! I’m a mother of 5 and my days are crazy busy. I’m busy with bringing the kids to their Girl Guide & Brownie meetings, swim class, and everything else that comes up in our hectic life. Somehow, in someway you have to try to make the time. Even if it’s an intense 10 minute workout, get it done. Your body will thank you!
Just remember I’m here to cheer you on & support you along your journey! Message me or follow me on my other social media sites. Instagram is the best place to connect with me. My handle is VeganMommyDee. 🙂


Saint Patrick’s Day Protein Balls!

Happy Saint Patrick’s Day!!!
Hi everyone, hope your having a great day! Things have been busy here in my neck of the woods, as life with five kids is always busy. Between swim class, girl guides, appointments, my kids social lives and everything else it gets quite busy. Not to mention doing all that with a 9 month old so everything takes a little longer to accomplish lol. I try posting on IG most often out of all my social media but I don’t to post on here as much as I would like unfortunately.
A lot of people have asked me for my protein ball recipe so I thought I should post it for everyone to enjoy. I decided to post my recipe for these super healthy and protein packed St. Patty’s Day protein balls since it’s coming up this Friday! We’re actually having a St Patty’s Day party at our house this year since I’m home and not working this year (I’m on Maternity Leave). I just added more Spirulina to my protein ball mixture to achieve this wonderful green colour so they look a little more festive. No added unhealthy dyes in these babies! By doing this I also made them a power house of nutrition. I have to say I just love how easy they are to whip up and the ingredients used are all staple ingredients in my home. These protein balls are protein packed with hemp hearts, vegan protein powder, and spirulina! Healthy fats are thrown in there too with yummy unsweetened creamy peanut butter! You can use whatever nut butter you have at home or prefer and they will still turn out amazing.
These protein balls are perfect for taking with you on the run for healthy snacking while doing errands. They will stop you from stopping for unhealthy fast food because they are quite filling and will hold you over until your next balanced meal. I love the fact that they’re also a great snack to take with you to the gym for a post workout snack. I store mine in the fridge in an air tight container for over a week but usually they don’t even last that long!
Here’s the super easy recipe for these tasty and healthy protein ball snacks.
St. Patrick’s Day Protein Balls
Ingredients:
- 1 tbsp. Spirulina
- 1 cup oat flour
- 1 cup unsweetened peanut butter
- 2 scoops of vegan protein powder
- 1 heaping tbsp. of hemp hearts
- 1/3 cup unsweetened almond or coconut milk
- 2 – 3 tbsp. of pure maple syrup
Tools:
- A medium sized glass or ceramic bowl
- Fork
- Storing container with an air tight lid
Method:
- Combine the oat flour with the vegan protein powder in your bowl
- Add the peanut butter and maple syrup
- using your fork combine ingredients and get the peanut butter well mixed in. The mixture with look quite crumbly.
- Next add the almond or coconut milk and continue to mix all the ingredients well.
- Form balls with the mixture and place inside an air tight container.

Note:
* The protein balls pictured above have less spirulina. I prefer to add a whole tbsp. but depending on who I’m serving them to I may add less. These have 1 tsp. in the mixture.
*You can add optional vegan chocolate chips or shredded coconut to your mixture too if desired as well.
Enjoy!

Baby Food Mania
Now that my vegan son is 7 months old I’m making a lot of homemade baby food. It’s healthy and full of nutrients unlike the store bought stuff sold out there. I feed my son REAL food. In my opinion the store bought jarred stuff isn’t quality food. If its able to sit on a shelf in a store for extended periods of time then its pumped with unpronounceable things I will not let my son ingest.
It’s incredibly easy to make homemade baby food. I just use what I have on hand and make sure I’m offering him a variety of yummy options. I usually bake his veggies like squash and boil or steam things like green beans. Steaming is better than boiling them in order to preserve more nutrients but when I’m in a rush I’ll boil them because its faster. I reserve some of the cooking water in case I need it when I’m blending it all up. When serving my baby his goodies I add some of his milk to his puree because he likes the added creaminess it provides.
So far my little man has tried peas, green beans, pumpkin, acorn squash, butternut squash, spaghetti squash, blueberries, raspberries, pineapple, avocado, beets, mango, cherries, carrots, sweet potato, apples and bananas. I’m sure I missed some but you get the picture. He has eaten quite a variety of fruits and veggies along with his brown rice cereal, oatmeal cereal, hemp hearts, chia seeds and coconut yogurt.
His favouite foods are pumpkin and sweet potato. I swear I can feed him pumpkin everyday and he would happily eat it up! I’ll post some of his favourite dishes below which are super easy to make. Even if your busy running around you can still manage to throw these together. The best part is once you make puree the veggies and fruit you can freeze the mixture in ice cube trays and store them in freezer bags for future use with only a few exceptions like avocado. Eat that right away! I love this idea because when I’m on the go I’ll pop a few cubes of different purees into travel containers and they defrost while I’m out doing errands. That way my vegan baby can eat healthy on the go. I just take them out 1st thing in the morning that way they have plenty of time to defrost. I also bring hemp hearts in a container with me to add to his food for extra nutrition and he loves the added taste from them.
What are some of your babies favourite foods? Let me know if you have a special way of preparing it below in the comment section. 🙂

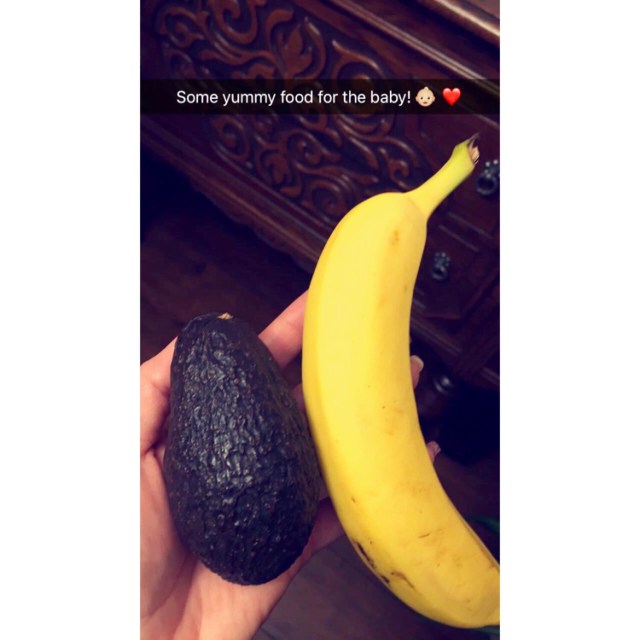
Banana & Avocado puree
Ingredients & Tools
- 1 Banana
- 1 Avocado
- Blender/Food Processer
How simple can this get right? It’s the simple things they will eat up though every time!
Method
- Just peel a banana and scoop out the flesh of an avocado and toss them into your blender or food presser.
- Transfer to a bowl and add breast milk or formula to the mixture for added creaminess if desired.
- Feed this mixture to your little one right away as the avocado in it will start to go brown.
*Note*
Top the mixture with Hemp Hearts if desired.

Baked Acorn Squash Puree
Ingredients & Tools
- 1 Acorn Squash
- 1 Baking dish
- Blender/Food Presser
- Optional: Cinnamon or Pumpkin Spice
Method
- Preheat oven to 350 F
- Prepare a baking dish with about an inch of water in it. Add more later if needed during the baking process
- Cut you acorn squash in half
- Sprinkle with a touch of Pumpkin Spice or Pure Cinnamon if desired
- Place flesh side down into the baking dish
- Bake for 35 – 45 minutes depending on the size of your squash
- Allow to cool and then scoop out the squash flesh into the blender or food processer
- Transfer mixture to an air tight container. I like placing it into glass containers or mason jars.
* Note*
I also like adding hemp hearts to the squash mixture when serving it to my son. He loves the added flavour and texture it adds to his meal. You can also add dash of breast milk or formula to it in order to make it a little creamier.

Chia Pineapple, Mango, Beet & Banana Puree
Ingredients
- 2 Bananas
- 1/3 Cup Pineapple
- 1 small to medium sized cooked Beet
- 1/3 cup Mango
- 1 tbsp. Chia Seeds
Method
- Add fruit and the beet to the blender and puree
- Place in an air tight container or mason jar and add the chia seeds. Combine well.
- Store in the fridge for up to 5 days
*Note*
My son loves to eat this mixture with a spoonful of unsweetened coconut yogurt with this mixture. Give it a try if your baby enjoys yogurt too.
Hope your baby enjoys this healthy grub! Even my 12 year old will ask me if he’s done with his food. She’s the clean up crew who wants to eat up all his yummy leftovers! Ha Ha!

Crispy Chickpeas!

Here is a super easy snack recipe that you can make anytime. It’s a protein rich snack which will also keep you full and satisfied. I currently have a chickpea obsession and have been adding them to so many dishes. I love them in my green salads as well as my pasta salads.
If you want a yummy snack on the go then these crispy chickpeas are awesome. You can add whever seasonings you like best and play around with the flavours you enjoy best. They can be stored in mason jars which is great for healthy snacking on the go! I even bring these to my childrens swim class. The kids enjoy them which makes me super happy. Let me know what seasoning combinations worked well for you in the comments below. Happy Healthy Snacking!
Ingredients:
- 2 cans of chickpeas
- 3-4 tbsp. of olive oil
- 1 tsp. paprika
- 1 tsp. garlic powder
- 1 tsp. chili powder
- 2 tsp.Himalayan salt
- 1/2 tsp. black pepper
Things you will need:
- 2 cookie trays
- Parchment paper
- Paper towel or a dry dish cloth
- 2 medium sized bowls
Method:
- Preheat oven to 400 F
- Line your cookie trays with parchment paper and set aside
- Open your cans of chickpeas, drain and rinse them
- Pat dry the chickpeas well
- Transfer chickpeas to a bowl
- Add 3-4 tbsp. of olive oil and salt to the chickpeas and toss well
- Divide the chickpeas and add them to the cookie trays
- Bake for 35 minutes, making sure to give them a mix a few times during the baking process
- After removing them from the oven place them into a bowl with all your seasonings and toss well
- Transfer to mason jars or containers
Note:
- Baking time may vary so keep an eye on them in the last 10 minutes.
- As far as seasonings go you can add whatever you prefer or have on hand.
- You can use less olive oil if you prefer but your chickpeas may not be as crunchy
- These can store well for a week in your mason jars
Other Seasoning Suggestions:
- Lemon Pepper seasoning & Himalayan salt
- Habanero pepper salt & chili powder
- Cinnamon, cane sugar or coconut sugar and using coconut oil instead of the olive oil

Happy Munching! Enjoy! 🙂
Smoothie Bowl Breakfast

Life is busy but there is always time to whip up a yummy smoothie bowl! All you need is fruit, milk, and healthy toppings. Super easy. I just add whatever frozen fruit I have in my freezer. We always have frozen bananas and blueberries so those appear in my smoothie bowls quite often. I also always add Spirulina to my smoothies as well for added health benefits.
Just blend or process them with a splash of non dairy milk and you have an instant nutritious breakfast. As far as toppings go my favourites are pumpkin seeds, chia seeds, sliced almonds, homemade granola, shredded coconut, hemp hearts and fresh sliced fruit. If your on the go with your smoothie then pop it into a mason jar with your toppings for easy travel!
There isn’t really a “recipe” for this but since people keep asking me what I put in my smoothies I said I’d post a couple for them to reference. The great thing about a smoothie is that you don’t need a recipe to dictate what you should or shouldn’t put in it. You just throw in what you enjoy and add the ingredients you have at home hiding in the freezer.
Have fun experimenting with your yummy fruit choices and playing around with different toppings!
Blueberry Bliss Smoothie Bowl
- 2 cups organic blueberries
- 1 frozen organic banana
- 1 Tbsp. Spirulina
- Splash of unsweetened non dairy milk (my favourites are almond or coconut)
Blend or process ingredients. Pour it in your favouite bowl and add your awesome healthy toppings! Below are my suggestions. It can’t get any easier than that right?!
- 1/4 – 1/3 cup Pumpkin seeds
- 1 tsp. of chia seeds
- 1 Tbsp. of Sliced almonds
Tropical Goodness Smoothie
- 1 organic frozen banana
- 2 cups pre packaged frozen pineapple, mango & coconut blend from your grocery store
- 1 Tbsp. Spirulina
Blend all the ingredients up and top with your desired toppings.
Suggested toppings:
- 1 Tbsp. of Hemp hearts
- 1 Tbsp. shredded coconut
- Sprinkle of homemade granola
- Banana slices
Enjoy your breakfast smoothie bowls! Your body will thank you for the healthy fuel you are giving it! 💕
~Debbie~
Raw Vegan PB Cheesecake love!
I made one of my favourite cheesecakes earlier this week … raw vegan peanut butter cheesecake! Anyone who knows me well knows that I’m a PB and over all nut freak. PB makes everything perfect! This was my 1st try making this cheesecake and I’m really happy with the outcome. So happy indeed that I’m sharing my recipe with you all right away. I’ve had many people ask me for this recipe once I posted a picture of it on Instagram. My new years resolution was to try and put pen to paper and actually write down my recipes so I did just that when I made this cheesecake. I’m not a fussy person and I love to bake and cook so I’ve become the queen at winging my recipes. I barely measure and don’t fuss about exact measurements. When people ask me for recipes, ask me to please consider writing a cookbook or teach cooking classes this becomes a problem however. I blame the way I am because of my mom (just joking) because she never used measurements when I used to cook/bake with her as a child. She intern leaned the a little of this and a bit of that type of measuring from her mother as well. I’m breaking the cycle now and these days I’ve made a conscious effort to try and write down the measurements that I’m using when I’m cooking or baking. So going back to this awesome raw cheesecake I didn’t overly sweeten mine so if your a major sweet tooth then add more sugar to your cheesecake. I’m a sweet tooth who has converted to an almost sugar free lifestyle so I try and limit how sweet I make my desserts. It’s really difficult sometimes but I just try and use dates and stevia when baking in order to make my desserts as healthy has possible. I love the natural sweetness that dates bring to desserts and what’s even better is they have many nutritional benefits. Hooray!
Here is my very simple recipe …
Raw Vegan Peanut Butter Cheesecake
You will need:
- 1 spring form pan ( I use a 9″ pan )
- 1/3 cup Pure organic coconut oil
- 1 400 ml can of coconut milk ( you will only use 1/2 of the can however)
- 5 cups Raw cashew halves
- 1 TBSP Maple syrup
- 2 cups Medjool dates
- 3 Powdered Stevia packets
- 1/3 cup vegan mini chocolate chips
- 1 1/2 cup Unsweetened natural peanut butter
- Food processor
Method:
- The 1st step which is the most important step of all is soak your cashews for at least 4 hours before making this recipe. I prefer to soak mine overnight. I just put the cashews in a glass bowl and cover them with fresh water the night before I’m making any cheesecake.
- Soak your dates in very warm water for 10 – 15 minutes so they can soften and become really plump. I also pop the can of coconut milk into the fridge while my dates soak. I find when the can is cold the cream becomes a little thicker and easier to scoop up after.
- You are going to start off with making the crust for the cheesecake by adding 2 cups of the raw cashews into the food processor with 7 pitted dates. Process until the dates have been incorporated well.
- Lightly oil your spring form pan with a little coconut oil
- Transfer the crust mixture into the spring form pan and press down well and evenly distribute it around the base of your pan.
- Now you can go ahead and make your filling by adding the following ingredients into the food processor: The remaining 3 cups of the the raw cashews, 1 TBSP of maple syrup, 1/3 cup coconut oil, 3 packets of stevia, 1 1/2 cup peanut butter, 1/2 of the can of coconut oil (skim the thickening coconut cream from on top as you don’t want the liquid for this recipe) and the remaining pitted dates. Process very well. Make sure to scrape down the processor’s bowl in order to make sure everything is combining well.
- Once combined well and it’s a nice creamy consistency then add your filling into the spring form pan and smooth it out evenly.
- Top with mini vegan chocolate chips
- Pop it into the freezer to set for at least 4 hours so the cheesecake can set nicely.
- Remove it from the freezer about 20-30 minutes before your want to slice it up and serve it. You can keep any left over slices in the fridge in an air tight container.
So incredibly easy to make right? The only thing you have to remember to do is soak your nuts and your dates so that your cheesecake turns out wickedly good! 🙂
Enjoy!
~Debbie~
*Remember to visit me on Instagram and take a look at how I try and live a healthy balanced lifestyle! I’m VeganMommyDee on there as well.*
Eat Healthy, Be Healthy!

Eat Healthy, Be Healthy!!! Everyday we make choices about our food, so make health conscious ones! Don’t make choices that are going to leave you guilt ridden. Even the most popular comfort foods can be made in healthier ways. I’ve made delicious healthy mac & “cheese” and pot pies which people love! They couldn’t believe they were vegan and healthy because they tasted so good. This is why I keep trying to tell people that healthy CAN taste good! Actually it can taste pretty darn amazing!
I’ve noticed that people can do pretty well making good food choices for meals for the most part but find it very difficult to snack healthy. One of the biggest lessons I leaned on my weight loss journey was to swap unhealthy snacks with healthy ones. If you’re a chip lover try eating homemade sweet potato chips or making yummy kale chips as an alternative. They are so tasty and guilt free! Even my teen has grown to love them and makes them at my house! If your more of a sweet tooth then swap things like sugar loaded ice cream with a healthy homemade version. Process frozen bananas and peaches or mango, freeze in a container for 10-15 minutes to set. How simple is that? Anyone can make it! When your on the run and busy carry nuts and seeds with you or fresh fruit. Everyone who knows me is totally used to me pulling out healthy snacks from my purse when I’m hungry. If you’re not prepared then you will be tempted to pick unhealthy food choices, so be prepared!
I wasn’t always a healthy individual and for most of my life I made poor food choices. I went from being the over weight child to a teen with an eating disorder and I was down to a size 1/2. After having all my children I then ended up very over weight and feeling horrible. I had a very significant amount of weight to lose in order to feel healthy! In 2009 I started to make little small improvements to my diet and becoming a little active. In 2010 I became more active and started walking a lot. Yes walking! So simple right? It was so effective though and the weight started coming off finally and people around me were noticing! By 2013 I lost about 80 lbs and I never dreamed I could accomplish that but I did. Am I done with my health journey? Nope. I have a little more weight to shed but I’m now focused on toning and becoming stronger everyday. So to anyone out there struggling to shed some weight … you can do it! If I can so can you! Keep going! Keep trying! Rome wasn’t built in a day and your weight isn’t gonna come off over night either. Be patient with the process, make healthy food choices and be consistent with your workouts and it will happen!
~ Debbie ~
Pancake Tuesday!
It’s Pancake Tuesday, Shrove Tuesday or Fat Tuesday … whatever ya wanna call it it’s fine by me! If you’re not familiar with it then just click on Shrove Tuesday & Fat Tuesday and the links will fill you in. As per tradition I made pancakes for my kids to enjoy this morning. I put together some super fast and easy pancakes while packing school lunches and getting my crew out the door on time. I made super Cinnamon vegan pancakes and Cinnamon & Blueberry pancakes as per my 9 year old’s request. When I’m in a big hurry (like today) I use a premixed flour pancake mix sometimes which contains healthy whole grains like brown rice, teff, spelt and quinoa flour. I like having a bag of the premixed flour handy but they sometimes contain sugar and I prefer sugar-free options. To sweeten my pancakes I’ve only been using sugar-free powder stevia and I love the results! I find the liquid stevia way too bitter in taste however so I stick to the powder form. That way the only sugar we are actually putting on our pancakes is the 100% natural Canadian maple syrup and the natural sweetness from the berries. I sometimes skip the maple syrup and just add a touch of pure organic coconut oil on top as an even healthier alternative … yea bring on the yummy good fats! Below is the in a rush on a school day recipe I used this morning 🙂
CINNAMON / BLUEBERRY CINNAMON PANCAKES
Ingredients:
- 1 cup of your favourite flour mix
- 1 tsp. aluminum free Baking Powder
- 1/4 cup filtered water
- 1/3 -1/2 cup unsweetened almond milk
- 1 melted tbsp. of coconut oil
- 3 packets of stevia
- 3 tbsp. flaxmeal mixed with 9 tbsp. of water, let sit for a couple of minutes to thicken up
- 1 tbsp. cinnamon, or to taste
- 1 pint of blueberries, I usually save some for garnish on top
- You will also need vegan butter or coconut to coat your pan for cooking
Method:
- Mix your flaxmeal with water and let it sit.
- In a medium-sized bowl add the flour, baking powder, cinnamon, and stevia. Mix well.
- Heat a frying pan with a vegan butter or coconut oil
- In a small bowl add the water, milk and the coconut oil and mix well. When adding the milk add in 1/3 cup and you can add more if needed afterward.
- Add the wet ingredients into the dry. Add in extra milk if you find your batter is too dry. Also add in the flaxmeal as well and combine. Don’t over mix however or your pancakes wont be as fluffy.
- Transfer the pancake mix to your preheated frying pan or griddle. They cook up fast so keep an eye on them.
NOTE:
- As far as the blueberries go I usually add them in to my batter once I’ve made some plain cinnamon ones as some of my kids prefer them without the blueberries. Then I gently add the blueberries into the batter and cook up the rest.
*This recipe makes about 6 good-sized pancakes so I normally double it.*
Enjoy! 🙂


You must be logged in to post a comment.