Dinner Rush Tacos!

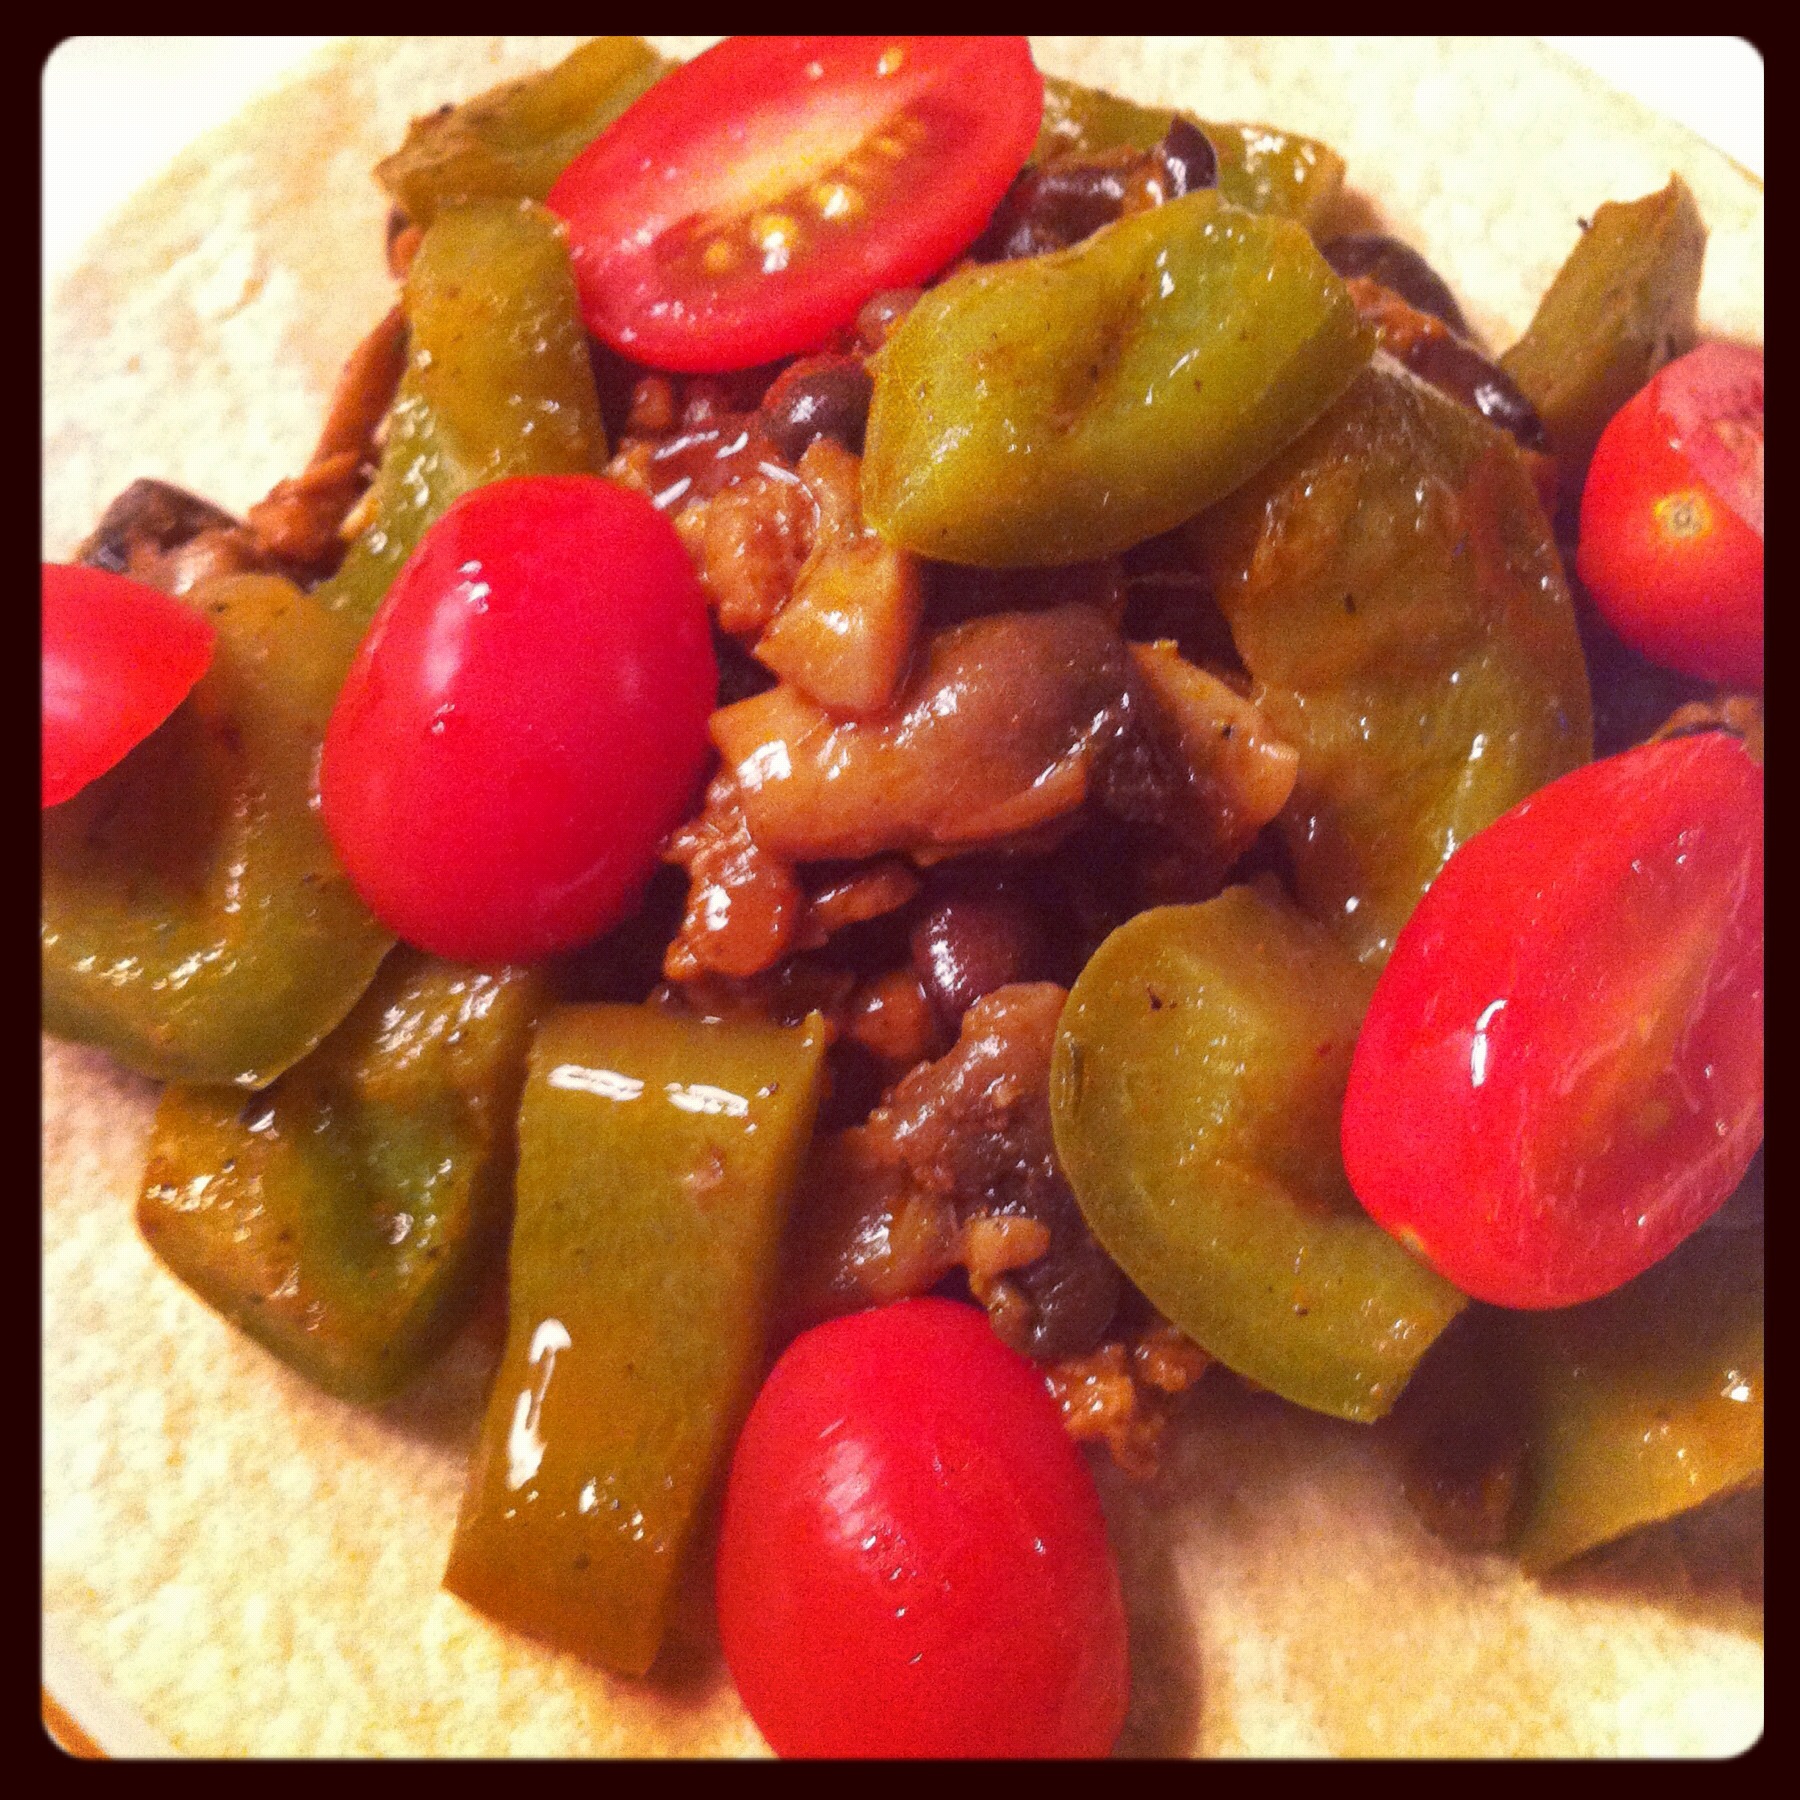
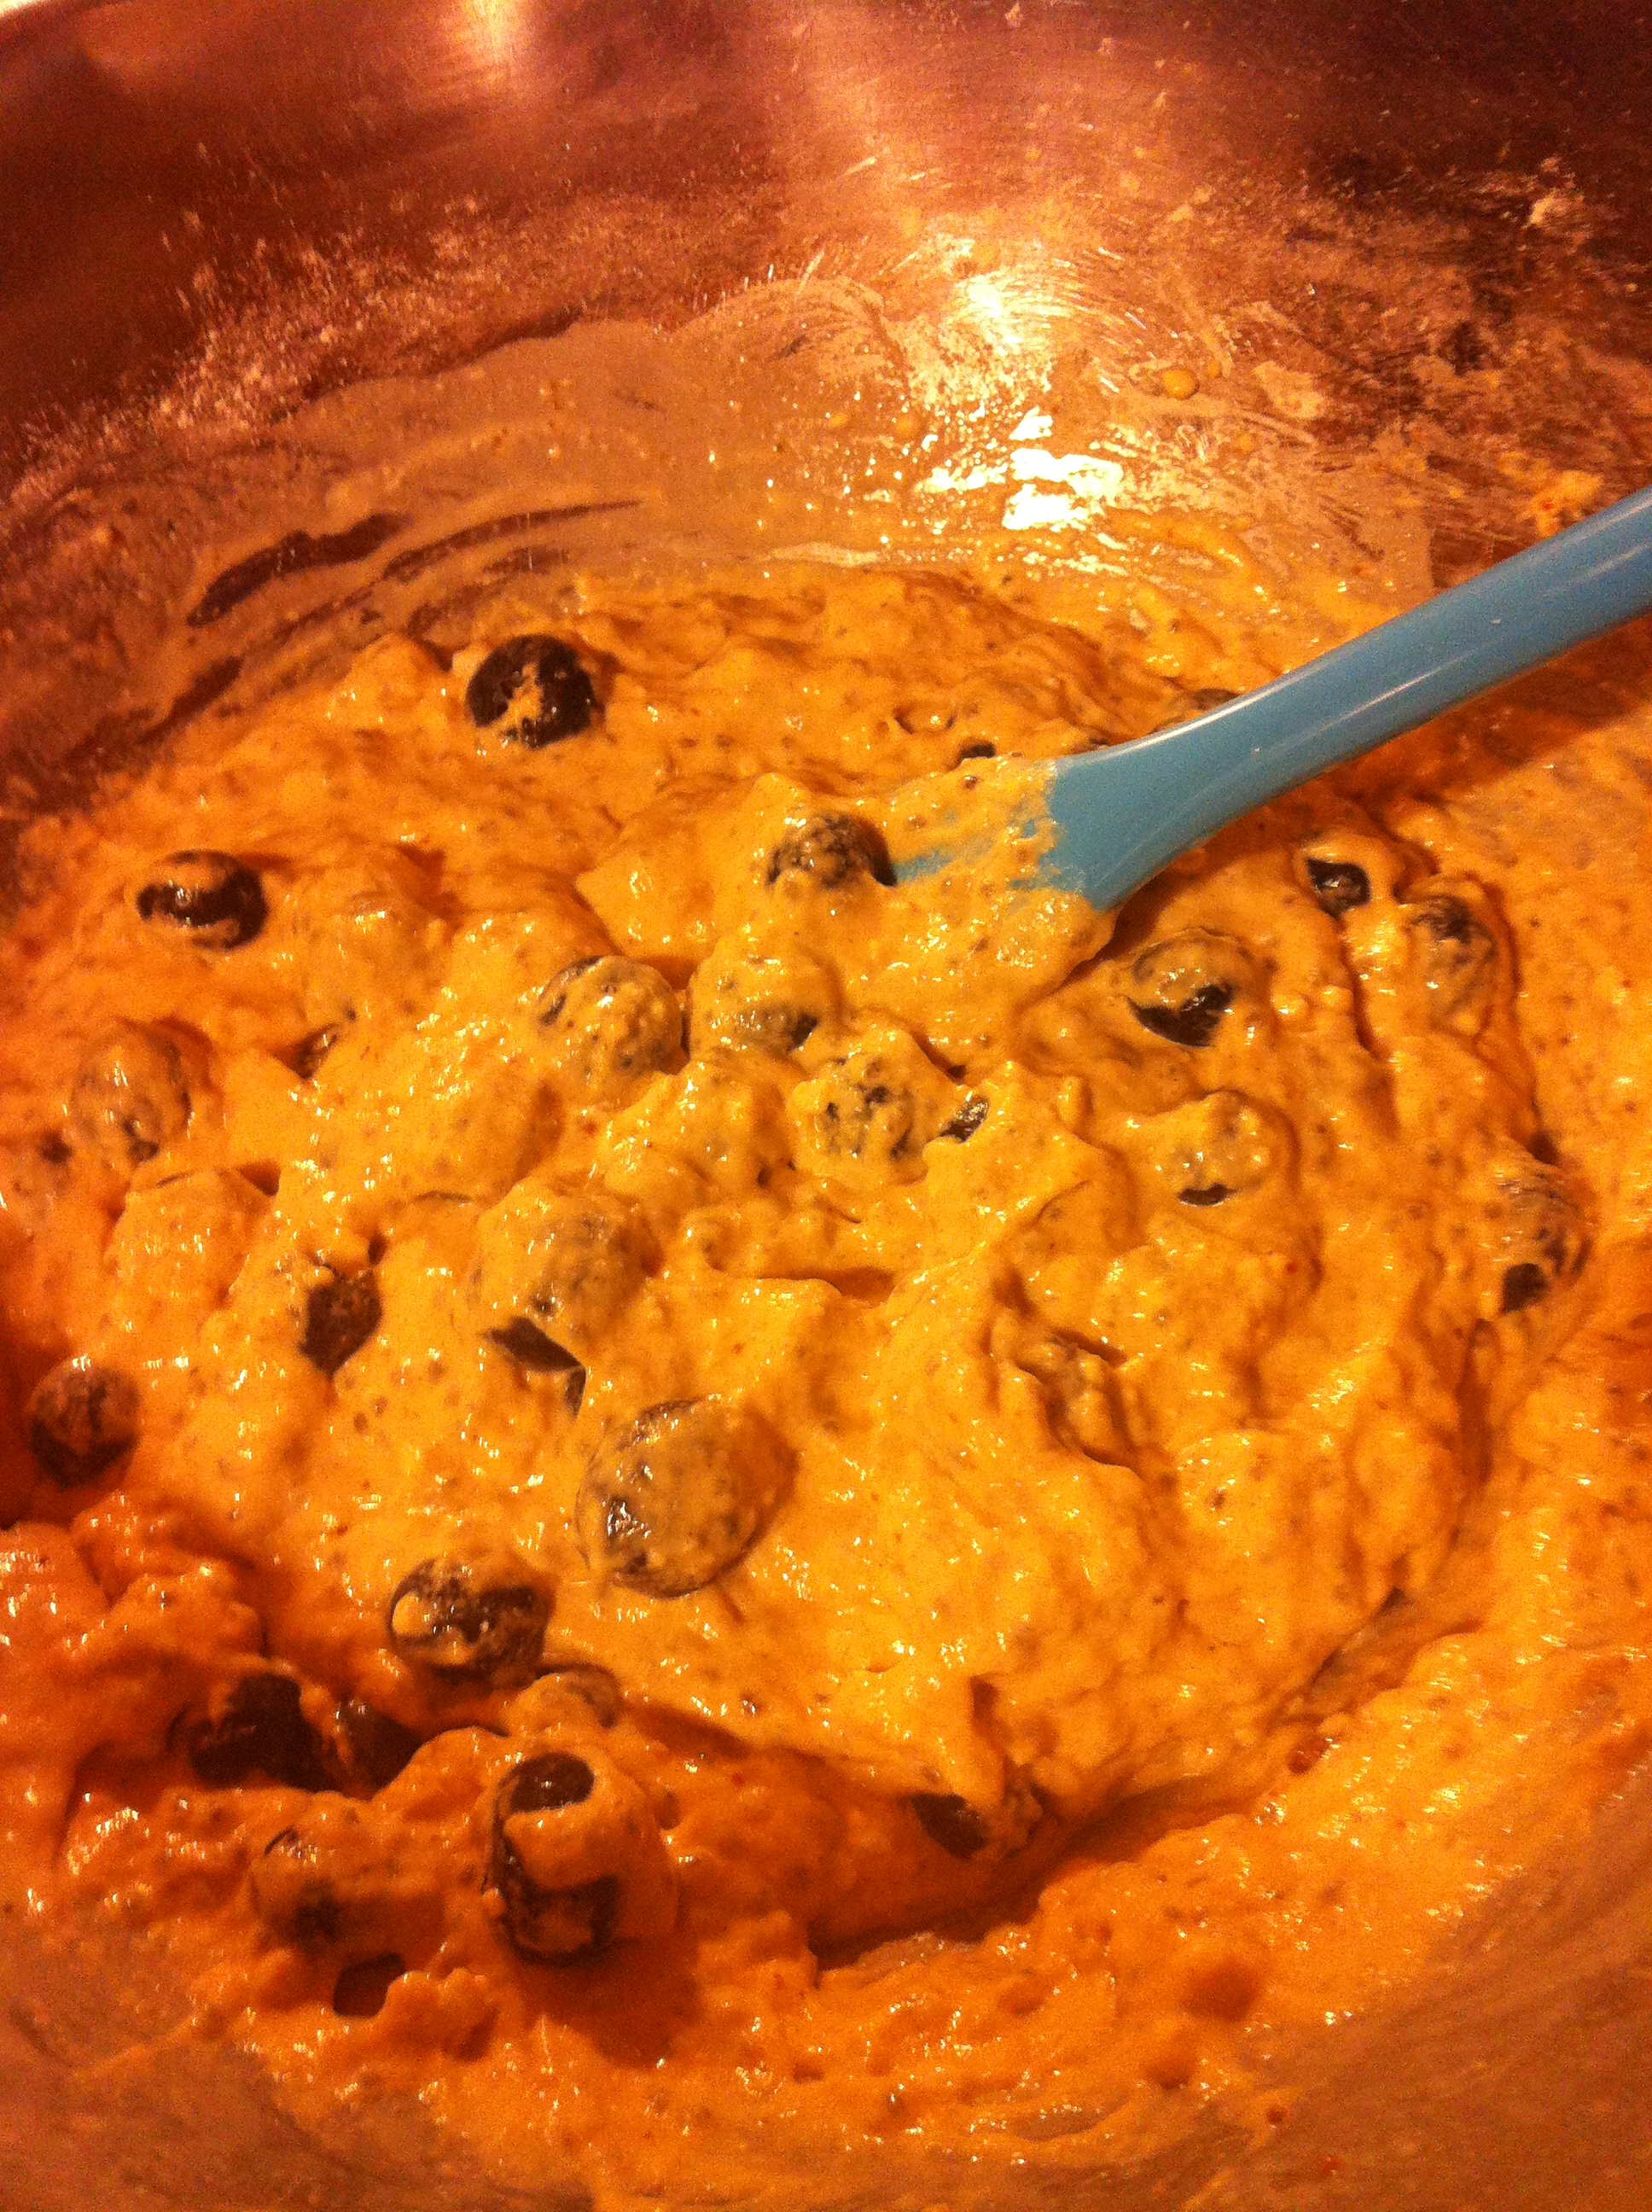
One of my gotta get dinner on the table fast meals is vegan/vegetarian tacos. They are always a hit with my kids! I love how you can use whatever veggies you have on hand and create a super fast meal. I cook up the veggie “meat” and always add black beans to it because it’s my kids favourite bean. As far as toppings go I use whatever I have in the fridge. I’ve made it using just the “meat” & beans along with chopped bell peppers, mushrooms and cherry tomatoes like pictured below. Other times I add in spinach or other mixed greens, corn and sliced avocado. Top it with a little hot sauce or taco sauce to give it a kick if you like and your cheese of choice. I don’t always top my tacos with “cheese” but if I do then I use a bit of daiya cheese. My kids eat their tacos vegetarian style and use regular cheese because they are not fans of faux cheese at all. As far as the veggie meat goes I try not using it very often because soy is one of the biggest foods genetically modified. When I do buy it I try to get organic when possible for a little piece of mind.


Dinner Rush Tacos!

You will need:

  • 1 package of tortilla wraps (I use the small size)
  • 1 package of veggie ground round/veggie “meat”
  • Spices and herbs of choice. I use paprika, oregano, chili powder, Himalayan pink salt and black pepper.
  • Veggies of choice, bell peppers, greens, tomato, etc.
  • 2 – 3 cloves of garlic, minced
  • 1 cup water
  • A couple tbsp.’s of olive oil
  • 1 can of black beans, drained and rinsed very well.
  • 1 large frying pan


Method:

  1. Heat olive oil in frying pan and add in garlic and sauté it for a minute on medium heat.
  2. Add your veggie “meat” into the pan and crumble it up.
  3. Next toss in your spices & herbs of choice as well as the black beans.
  4.  Give it a good mix and sauté for about 5 minutes on a medium heat.
  5. Add 1 cup of water and combine well. Cook for about 15 minutes until most of the liquid has been absorbed and your beans are softened.


* You can either add in veggies such as bell peppers & mushrooms to your meat & bean mixture and slightly cook them up or serve them raw in your taco*


To assemble:

  1. Grab a tortilla wrap and add some of the meat & bean mixture to it and add your veggies of choice.
  2. Top with cheese and taco or hot sauce if desired.
  3. DONE!!! Dinner is served! 🙂


Yep it’s pretty much the easiest meal to whip together which is perfect for rushed dinner times!

Enjoy! 🙂


Image

Breakfast Green Smoothie!

I always enjoy a yummy breakfast smoothie daily. It’s the perfect way to add extra greens into our diets! I love creating new smoothies and trying different combinations of fruits and veggies. This recipe is very easy and fast to whip up so it’s perfect for hectic mornings!


Breakfast Green Smoothie

  • 1 frozen banana
  • 1 tightly packed in cup of spinach or mixed greens of choice
  • 2 1/2 cups filtered water
  • 1/2 cup chopped cucumber
  • 1 large peach, sliced
  • 1  scoop of vegan protein powder
  • 1 tsp. Spirulina


Toss everything into your blender and liquefy. Check consistency and add a bit more water if needed as some protein powders thicken smoothies up more than others.

Enjoy!


Green Smoothie


My Raw Vegan Pumpkin Pie!

I’m finally posting the recipe for my Raw Vegan Pumpkin Pie !!! Many people have asked me for this recipe so here it is! It’s super easy to make and so far everyone who has tried it has loved it! When I cook and bake I pretty much always just eyeball the quantities of my ingredients. Not good when your being asked for your recipes often! I’ve now forced myself to pay attention to the quantities and write down my recipes as I go. This recipe is easily adapted so adjust the spice amounts as desired. Everyone is different. Some people like their pie mild in flavor and others like it strong. I’m kinda of a mid range person and that’s what my recipe reflects. As far as nuts go I prefer to use raw cashew halves in my pie filling as well as the crust. I’ve done it with walnuts and it turns out good in flavor but I find the texture of the pie is much better when I use cashews. So although Thanksgiving has already passed for us in Canada I still made another raw pumpkin pie this week. Hey it’s still fall so I think it’s still appropriate! For my lovely American friends & family this recipe is coming to you in perfect timing! Your welcome! 🙂


My Raw Vegan Pumpkin Pie


RAW VEGAN PUMPKIN PIE


Ingredients for the crust:

  • 1 cup raw cashew halves (no need to soak the nuts for the crust)
  • 1 tbsp. unsweetened shredded coconut
  • 2 medjool dates, pitted


Ingredients For the pie filling:


  • 1 1/2 cup raw soaked and drained cashew halves
  • 1/2 cup pure maple syrup or agave
  • 1 1/2 cups pure pumpkin puree (Not pumpkin pie filling!)
  • 1/2 tsp. pure vanilla extract
  • 1 heaping tbsp.’s cinnamon, or to taste
  • 2 tsp. pumpkin spice, or to taste
  • 3 heaping tbsp.’s coconut oil
  • 10 medjool dates, pitted


You will also need:

  • 1 pie plate or desired dish
  • food processor
  • large bowl
  • medium-sized bowl
  • kettle


* For best results soak your cashews over night!!! Add the 1 1/2 cups raw cashew halves into a large bowl and cover with water. Give it a quick mix and leave them overnight on your countertop. *


Method:


  1. Place the dates in a medium-sized bowl and add boiled water to them from your kettle. Let them sit there 10-20 minutes to soften up.
  2. After your dates have softened you can remove 2 from the bowl and after pitting it add it to the food processor. Your now going to make your pie crust. Add in the 1 cup of raw cashews and the 1 tbsp. of shredded coconut. Use the pulse option in order to just combine the ingredients slightly. I then use the low setting on my food processor to combine the ingredients well.
  3. Remove the crust ingredients and add them to your pie plate. Use your fingers to press down the mixture and spread it out evenly. Set aside.
  4. Remove the other 10 dates from the water and remove the pits. Add them to the food processor.
  5. Strain the water out of your 1 1/2 cups cashews and add them to your food processor as well.
  6. Add in the 1 1/2 cups pure pumpkin puree, 1 heaping tbsp. cinnamon, 2 tsp. pumpkin spice and the 1/2 tsp. pure vanilla extract.
  7. Next add the 3 heaping tbsp.’s of coconut oil
  8. Pulse to just chop everything slightly and then use the high-powered option and blend well. I stop mine and use a spoon to scrape down the sides of the processor a couple of times in order to make sure that the nuts puree well.
  9. It should be a beautiful smooth consistency. Taste and adjust the spice as needed at this point.
  10. Transfer the pie filling into your pie plate. Smooth it out evenly and cover it up with clear cling wrap.
  11. Pop it into the freezer for at least 4- 6 hours until it’s set and firm. Once it’s set really well you can place it into the fridge. Take the pie out a few minutes before your going to slice and serve it so that it comes to room temperature.


* I’ve also been known just kept my pies in the freezer and only cut the slices I need. I let them come to room temperature and serve them.  My kids enjoy adding whipped cream on top of their pie slice but I eat mine plain. I think it’s perfect just like that!  🙂


Enjoy!


Raw Vegan Pumpkin Pie


Quinoa Berry Bake

Healthy Quinoa Berry Bake!

Healthy Quinoa Berry Bake!


My quinoa berry bake is so incredibly easy to make! You can put this berry bake together in about 5 minutes! Yes that fast I swear! I use frozen or fresh berries for this bake. It’s not a fussy recipe so use whatever you prefer. I sometimes buy a frozen berry variety that also has cherries in it and it turned out really yummy too. I only add 2 tbsp. of pure maple syrup to my berry bake but most people will not find it sweet enough so I suggested 3 – 4 tbsp. You might have noticed that I make a lot of fruit bakes or crumbles. I like how by making them I can enjoy a sweet treat without feeling guilty about eating it!  I have a sweet tooth so I’m always trying to create healthy yet satisfying treats. My sweet tooth is happy with this simple berry bake!!! 😀 I’ve had some people ask me for the recipe so here it is ….


QUINOA BERRY BAKE


You will need:

  • 1 1/4 cup Organic Quinoa Flakes
  • 1 tsp. Cinnamon
  • 3 tbsp. Flaxmeal
  • 1-2 tbsp. Hemp Hearts
  • 3-4 tbsp. pure maple syrup, agave or other sweetener of choice
  • 1 baking or pie dish
  • 2 cups mixed berries (I used blueberries, raspberries, strawberries, blackberries and I also threw in cherries)
  • 1 1/3 cup unsweetened almond milk


Method:

  1. Preheat oven to 350 F
  2. Grab your baking or pie dish and add the 1 1/4 cup quinoa flakes, 1 tsp. cinnamon, 1-2 tbsp. hemp hearts and 3 tbsp. of flaxmeal.
  3. Next throw in your mixed berries of choice and also add the maple syrup. Give it a good mix.
  4. Even it out in your baking dish and then pour in your 1 1/3 cup milk. You don’t even need to mix it because your quinoa flakes will start to absorb the milk.
  5. Pop it into the oven and bake for approximately 35 minutes.
  6. Allow to cool off a bit once baked in order to cut neat slices.


Enjoy!


Quinoa Berry Bake Slice!

Quinoa Berry Bake Slice!

Simple Bean & Herb Salad

Simple & Easy Bean And Herb Salad!

Simple & Easy Bean And Herb Salad!


I’ve had many people ask me for this specific bean salad recipe so I thought I’d just post it here for everyone. I make many different types of bean salads but this is one of my favourite ones. It’s always a hit with family and friends! I use chickpeas and black beans in this salad but the bean possibilities are endless so use whatever you have on hand. I love how you can use whatever staple ingredients you have at home and create a lovely protein packed salad super fast!  I like adding chopped bell peppers into it because it adds a pop of colour to the salad and adds another element of great taste as well. For me fresh parsley is a must for bean salad so I add in a lot of it! I like to top my salad with healthy hemp hearts to finish it off.


Simple Bean & Herb Salad


You will need:

  • 2  – 19 oz  can of black beans
  • 1 – 28 oz large can of chickpeas
  • 3 – 4 large cloves of garlic
  • 3 – 4 tbsp. hemp hearts
  • 3 Tbsp.’s Apple Cider Vinegar, adjust to desired taste
  • 3 Tbsp. Olive Oil, adjust according to desired taste
  • Salt & black pepper
  • handful of parsley, I use two handfuls 🙂
  • large bowl or large container


Method:

  1. Mince the garlic
  2. Open up the cans of beans and rinse, rinse, rinse them very well!!!
  3. Add beans to your bowl or sealable container and toss in the garlic
  4. Drizzle with a 3 tbsp.’s of extra virgin olive oil and 3 tbsp.’s of apple cider vinegar. Adjust to desired taste. Add more olive oil or ACV if you need depending on how strong you want the flavors to be.
  5. Season with Himalayan salt and black pepper and add the parsley.
  6. Mix well and top with 3 – 4 tbsp. of hemp hearts on top.


* I keep my bean & herb salad in the fridge to let the flavors marry for a while before serving. The longer it sits the better it will taste!!!*


Enjoy!

Banana Chocolate Chip Cake

Banana Chocolate Chip Cake!

Banana Chocolate Chip Cake!


Almost every week I make banana chocolate chip muffins because they are my kids favourite type of muffin. It get’s kinda boring sometimes so I sometimes make a banana chocolate chip cake instead. Hey why not switch it up a little? Right? We go through a lot of bananas at my house! That’s ok though because these energy powerhouses have many health benefits such as containing potassium, fiber, vitamin C, B Vitamins, iron, they are a mood enhancer, and are good for the heart and nerves. I incorporate bananas in a variety of ways from my morning smoothies, muffins, and in hot breakfast cereals and oatmeal. 🙂

Here is my super easy recipe for Banana Chocolate Chip cake …


Banana Chocolate Chip Cake


You will need:

  • 3 medium-sized bananas
  • 1/4 cup coconut or sucanat  sugar
  • 1/4 cup coconut oil
  • 1/3 cup mini vegan chocolate chips, or regular sized vegan chips
  • 1 tsp. pure vanilla extract
  • 1 cup brown rice flour
  • 2 tsp. baking powder
  • 1 cup unsweetened almond milk


Method:


  1. Preheat your oven to 400 F
  2. Mash your bananas in a medium-sized bowl.
  3. Add the coconut oil and sugar to the mashed bananas.
  4. Next add the vanilla extract and give it a good mix.
  5. In a large bowl add the brown rice flour and baking powder and mix well. I use a fork to make sure my baking powder is incorporated well.
  6. Add the wet ingredients into the dry and also add in the almond milk into the bowl.
  7. Combine well and add the vegan chocolate chips to the mixture.
  8. Grease a baking pan with coconut oil and add the mixture into the dish. Even it out and pop it into the oven.
  9. Bake for about 30-35 minutes, ovens vary.
  10. Once baked allow the cake to cool completely before slicing it!


That’s it! Very easy and fast to make!

Enjoy!

~ Squash & Bell Pepper Soup ~

I grow butternut squash in my vegetable garden every year. They are very easy to grow and I love eating healthy squash in a variety of ways. One of my favourite ways to enjoy it is roasted and then I puree it into a lovely soup. Often I like adding bell peppers to my soup for added nutrition as well as for another dimension of flavor. This soup doesn’t require many ingredients and a lot of time to make. The only time-consuming part is the time that it is roasting in the oven. Find other things to do during that time and the time will pass very quickly. I like popping my squash into the oven in the morning. It cooks for an hour while I get ready in the morning and get my kids ready and off to school. That way once dinner comes all you have to do is puree it and heat it in a pot! So easy! It always seems that the simplest recipes are the best ones! Here is my recipe based on 2 large serving sizes. Double it if you like and eat it more than once this week! 🙂


Squash!

Squash!


Healthy Squash & Bell Pepper Soup!!!

Healthy Squash & Bell Pepper Soup!!!

Squash & Bell Pepper Soup!


What you will need:

  • 1 large butternut squash
  • 4-5 cloves of garlic
  • salt, black pepper & paprika, to taste
  • 2 large red, yellow or orange bell peppers
  • Chopped onion, I use less than half of an onion
  • 3/4 cup water
  • 1/2 cup unsweetened almond milk
  • extra virgin olive oil


Squash & Bell Pepper Soup!


Method:

  1. Preheat oven to 350 F
  2. Cut your squash in half and remove the seeds.
  3. Place into a baking dish and drizzle a little olive oil on it and season with a little salt and pepper.
  4. Cut up your bell peppers in chunks and the onion then place them into the baking dish as well. Keep the onion chunks rather large.
  5. Add your peeled and whole garlic cloves to the baking dish.
  6. Roast for 1 hour. I give the bell peppers a mix at the half way point.
  7. After removing your squash and peppers from the oven let them cool off in the dish.
  8. Once your ready to puree your veggies then add them to your blender. Also add 3/4 cup water to the blender too.
  9. Once blended thoroughly transfer to a medium-sized pot and heat at a low-med heat. Add 1/2 cup of unsweetened almond milk to the soup.
  10. 10. Season with Himalayan salt, black pepper and a little paprika and give it a good mix.
  11. Transfer to soup bowls and enjoy immediately while it’s hot!


squash soup

That’s it! So simple right? Enjoy!!!  🙂

Enjoying My Soup Outdoors! :)

Enjoying My Soup Outdoors! 🙂

Collard Wraps

Collard Wraps


I grew up eating collards and every year I grow them in my vegetable garden. They are incredibly healthy and I use them a lot in my soups. I also really enjoy using them to make healthy wraps instead of using a tortilla. Our waist lines will thank us for these small healthy conscious choices that we make!!! You can eat the collards raw if your using small leaves. Mine were large and a bit tough so I popped mine into boiling salted water for just a few seconds just to soften them slightly. Once I remove them from the water I pat them dry with paper towel or a clean tea towel. You can eat them wrapped up with veggies and add optional sautéed tofu strips if desired. I like to add homemade garlic Dijon dressing to them sometimes just to give them some extra flavor. 🙂


Garden Fresh Collards

Garden Fresh Collards


What you will need:

  • Washed Collard leaves, as many as you need. Small leaves can be used for one wrap. The larger leaves can be cut in half and you can make two wraps with them.
  • Chopped/Julienne veggies of choice. I like adding carrot, cucumber, sprouts and bell peppers to mine.
  • small bowl
  • Serving dish or plate
  • 1 tsp. natural garlic Dijon mustard
  • 2-3 tbsp. apple cider vinegar
  • 3-4 tbsp. olive oil
  • black pepper, to taste
  • pot with water and  a dash of Himalayan salt to it


Collards


Method:

  1. Place pot of water on to boil with the salt.
  2. Make the dressing by adding the garlic Dijon mustard to a small bowl, then whisk in the apple cider vinegar and olive oil. Add desired amount of pepper and give it another mix.
  3. Chop/Julienne your veggies of choice.
  4. Add the collard leaves to the pot of boiling water for just a few seconds to soften slightly.
  5. Remove the collard leaves and pat dry with paper towel or a clean tea towel. Allow them to cool before assembling your wraps.
  6. Once cooled add the collard leaves on a time to a plate or cutting board so you can start filling your wraps. Add a little of each vegetable of choice. If your going to be eating these wraps right away then you can add a drizzle of the dressing in the wrap before you close it up. If you’re not eating them right away then I suggest you just place the dressing on the side. You can add the dressing to them later or else you will have soggy wraps!
  7. Transfer each wrap to a serving dish or plate.


That’s it! So easy and fast to make and collards provide you will incredible health benefits!

Enjoy! 😀


Collard Wraps

Fresh Spring Rolls

Making fresh spring rolls is super easy and boy are they tasty!!! They are a great way of using up those veggies in your fridge! Bust them out, chop them up and let’s make some spring rolls!!! I like adding veggies like carrots, bell peppers, cucumber, sprouts, lettuce, spinach, parsley and cabbage to my spring rolls. The options are endless so add whatever you enjoy and that you have on hand! I always have  a package of rice paper rolls in my fridge just in case I need to whip up a fast meal. I prefer using the small-sized rice paper but I sometimes buy the large size and then chop them in half once they are stuffed. Staples like this are what save me from resorting to picking up fast food on the run! 🙂


Fresh Spring Rolls


Fresh Spring Rolls


You will need:

  • 1 package of rice paper rolls, I prefer the small size
  • Chopped/Julienne veggies of choice
  • 3 tbsp. light soy sauce or alternative
  • 1 tbsp. Vegan/Vegetarian Hoisin sauce
  • 3 cloves of garlic, minced
  • 1 tbsp. chopped peanuts, optional
  • baking dish with water
  • small bowl
  • serving dish or plate


Fresh Spring Rolls


Method:

  1. Make you dipping sauce by mixing the soy sauce, hoisin sauce, optional peanuts and garlic together in a small bowl. The longer this sits the better garlic flavor you will have … so yummy!
  2. Chop/Julienne veggies of choice.
  3. Add a rice paper into the baking dish with water and allow the paper to soften. Be careful not to over soak it because then the paper will break and become soggy!
  4. Transfer the rice paper to a large plate or cutting board so you can assemble the spring roll. Add a little of each veggie and some herbs if you’re using them to the rice paper roll. Remember not to over stuff it or else it wont roll up properly!
  5. Roll it up and place it on your serving plate or dish.
  6. Keep assembling as many as you like. Place the dipping sauce bowl in the middle of your serving plate or right beside it when your ready to serve them.
  • If your making them ahead of time then just cover them with plastic wrap and place them into the fridge. Sometimes I make them the night before. They are a fantastic & very healthy lunch to pack up for the next day!


Enjoy 😀


Blueberry Chia Muffins

Healthy Blueberry Chia Muffins!

Healthy Blueberry Chia Muffins!


Mmmmmmm Blueberry Muffins!!!!! Healthy Blueberry muffins of course! 🙂 I make blueberry muffins often but usually use flaxmeal as my “eggs in my recipes. I played around with using Chia seeds as my “eggs” the last couple times I baked blueberry muffins. I love chia seeds and use them often in baking, smoothies and in my breakfasts. Chia seeds are a powerhouse of nutrition such as omega3 , protein, calcium and iron! They make me feel energized and they help me stay full longer so they are a staple in my kitchen. I use organic coconut oil in my muffins because I like the slight coconut taste it gives to the muffin and of course the health advantages but veggie oil can be substituted instead if needed. I usually use brown rice flour when I bake but I have also used spelt flour to make these muffins. Either way they turn out super yummy! As far as sugar goes I either use sucanat or coconut sugar in my baking. My kids prefer when I use the sucanat however. Anyway, as always this recipe is super easy to make!


Blueberry Chia Muffins


Ingredients:

  • 1 1/2 cups Flour ( I use brown rice flour or spelt flour)
  • 1 TBSP Chia seeds
  • 1/2 cup Water
  • 3/4 cup Almond Milk
  • 1/3 cup Coconut Oil
  • 1 1/4 cup Blueberries
  • 1/3 – 1/2 cup Sucanat or Coconut Sugar (I use 1/3 cup)
  • 2 TSP Baking Powder
  • pinch of Himalayan salt


Method:

  1. In a medium-sized bowl add 1 TBSP Chia seeds and 1/2 cup water to it. Mix and let it sit to thicken for 20-30 minutes. Give it a mix every now and then in that time period.
  2. Preheat the oven to 400 F
  3. In a large bowl add flour, sugar, salt and baking powder. Mix well.
  4. Add the coconut oil and milk into the chia mixture. Combine well.
  5. Place the wet ingredients into the dry ingredients and mix well.
  6. Gently fold in the blueberries into the mixture.


blueberries


blueberry chia batter


7. Line the muffin tin with paper liners or grease the baking tin.

8. Fill the muffin tin evenly with the mixture and pop it into the preheated 400 F oven. Bake for about 20 – 25 minutes. I find that mine are done at 25 minutes but every oven varies.

9. Once baked let them cool off in the muffin tin or they can also transferred to a cooling rack to cool off. Place in an airtight container once they have cooled down.

Healthy and so simple to make … Enjoy!


Blueberry Chia Muffins


*For a glimpse into my foodie life follow me on Instagram ~  VeganMommyDee and Twitter at MommyDeeOf3 🙂