Collard Wraps

Collard Wraps


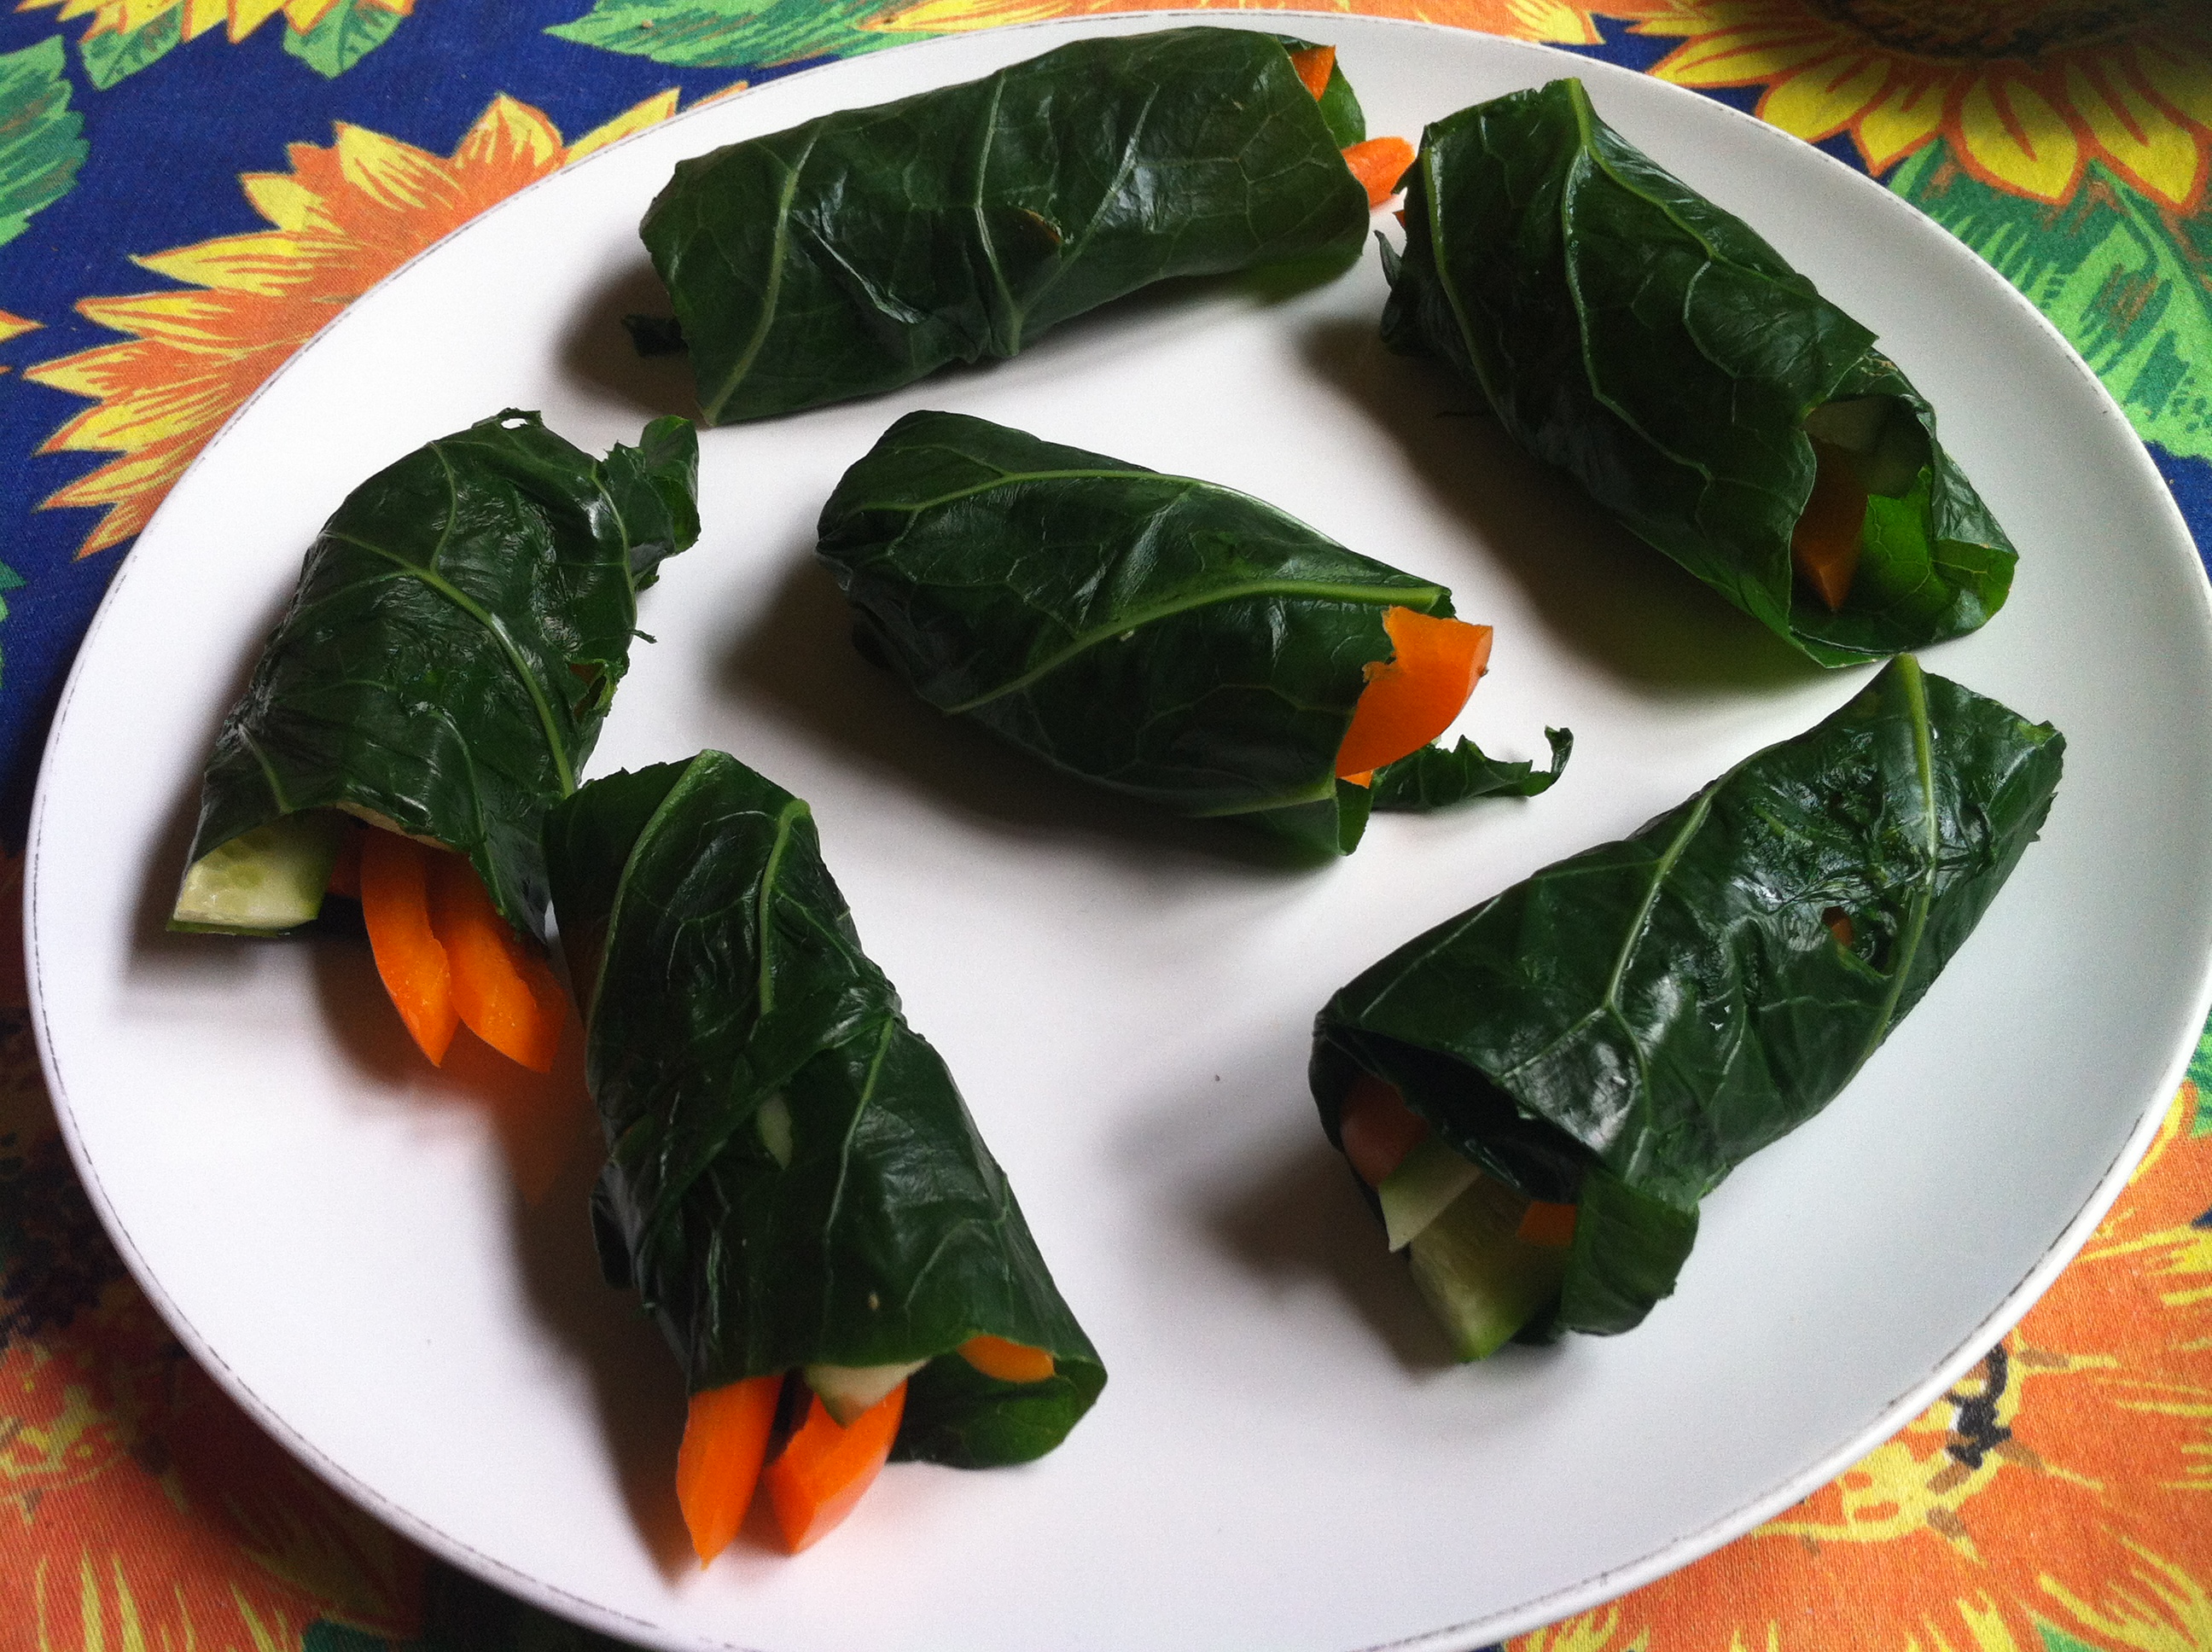
I grew up eating collards and every year I grow them in my vegetable garden. They are incredibly healthy and I use them a lot in my soups. I also really enjoy using them to make healthy wraps instead of using a tortilla. Our waist lines will thank us for these small healthy conscious choices that we make!!! You can eat the collards raw if your using small leaves. Mine were large and a bit tough so I popped mine into boiling salted water for just a few seconds just to soften them slightly. Once I remove them from the water I pat them dry with paper towel or a clean tea towel. You can eat them wrapped up with veggies and add optional sautĂ©ed tofu strips if desired. I like to add homemade garlic Dijon dressing to them sometimes just to give them some extra flavor. 🙂


Garden Fresh Collards

Garden Fresh Collards


What you will need:

  • Washed Collard leaves, as many as you need. Small leaves can be used for one wrap. The larger leaves can be cut in half and you can make two wraps with them.
  • Chopped/Julienne veggies of choice. I like adding carrot, cucumber, sprouts and bell peppers to mine.
  • small bowl
  • Serving dish or plate
  • 1 tsp. natural garlic Dijon mustard
  • 2-3 tbsp. apple cider vinegar
  • 3-4 tbsp. olive oil
  • black pepper, to taste
  • pot with water and  a dash of Himalayan salt to it


Collards


Method:

  1. Place pot of water on to boil with the salt.
  2. Make the dressing by adding the garlic Dijon mustard to a small bowl, then whisk in the apple cider vinegar and olive oil. Add desired amount of pepper and give it another mix.
  3. Chop/Julienne your veggies of choice.
  4. Add the collard leaves to the pot of boiling water for just a few seconds to soften slightly.
  5. Remove the collard leaves and pat dry with paper towel or a clean tea towel. Allow them to cool before assembling your wraps.
  6. Once cooled add the collard leaves on a time to a plate or cutting board so you can start filling your wraps. Add a little of each vegetable of choice. If your going to be eating these wraps right away then you can add a drizzle of the dressing in the wrap before you close it up. If you’re not eating them right away then I suggest you just place the dressing on the side. You can add the dressing to them later or else you will have soggy wraps!
  7. Transfer each wrap to a serving dish or plate.


That’s it! So easy and fast to make and collards provide you will incredible health benefits!

Enjoy! 😀


Collard Wraps

Fresh Spring Rolls

Making fresh spring rolls is super easy and boy are they tasty!!! They are a great way of using up those veggies in your fridge! Bust them out, chop them up and let’s make some spring rolls!!! I like adding veggies like carrots, bell peppers, cucumber, sprouts, lettuce, spinach, parsley and cabbage to my spring rolls. The options are endless so add whatever you enjoy and that you have on hand! I always have  a package of rice paper rolls in my fridge just in case I need to whip up a fast meal. I prefer using the small-sized rice paper but I sometimes buy the large size and then chop them in half once they are stuffed. Staples like this are what save me from resorting to picking up fast food on the run! 🙂


Fresh Spring Rolls


Fresh Spring Rolls


You will need:

  • 1 package of rice paper rolls, I prefer the small size
  • Chopped/Julienne veggies of choice
  • 3 tbsp. light soy sauce or alternative
  • 1 tbsp. Vegan/Vegetarian Hoisin sauce
  • 3 cloves of garlic, minced
  • 1 tbsp. chopped peanuts, optional
  • baking dish with water
  • small bowl
  • serving dish or plate


Fresh Spring Rolls


Method:

  1. Make you dipping sauce by mixing the soy sauce, hoisin sauce, optional peanuts and garlic together in a small bowl. The longer this sits the better garlic flavor you will have … so yummy!
  2. Chop/Julienne veggies of choice.
  3. Add a rice paper into the baking dish with water and allow the paper to soften. Be careful not to over soak it because then the paper will break and become soggy!
  4. Transfer the rice paper to a large plate or cutting board so you can assemble the spring roll. Add a little of each veggie and some herbs if you’re using them to the rice paper roll. Remember not to over stuff it or else it wont roll up properly!
  5. Roll it up and place it on your serving plate or dish.
  6. Keep assembling as many as you like. Place the dipping sauce bowl in the middle of your serving plate or right beside it when your ready to serve them.
  • If your making them ahead of time then just cover them with plastic wrap and place them into the fridge. Sometimes I make them the night before. They are a fantastic & very healthy lunch to pack up for the next day!


Enjoy 😀


Blueberry Chia Muffins

Healthy Blueberry Chia Muffins!

Healthy Blueberry Chia Muffins!


Mmmmmmm Blueberry Muffins!!!!! Healthy Blueberry muffins of course! 🙂 I make blueberry muffins often but usually use flaxmeal as my “eggs in my recipes. I played around with using Chia seeds as my “eggs” the last couple times I baked blueberry muffins. I love chia seeds and use them often in baking, smoothies and in my breakfasts. Chia seeds are a powerhouse of nutrition such as omega3 , protein, calcium and iron! They make me feel energized and they help me stay full longer so they are a staple in my kitchen. I use organic coconut oil in my muffins because I like the slight coconut taste it gives to the muffin and of course the health advantages but veggie oil can be substituted instead if needed. I usually use brown rice flour when I bake but I have also used spelt flour to make these muffins. Either way they turn out super yummy! As far as sugar goes I either use sucanat or coconut sugar in my baking. My kids prefer when I use the sucanat however. Anyway, as always this recipe is super easy to make!


Blueberry Chia Muffins


Ingredients:

  • 1 1/2 cups Flour ( I use brown rice flour or spelt flour)
  • 1 TBSP Chia seeds
  • 1/2 cup Water
  • 3/4 cup Almond Milk
  • 1/3 cup Coconut Oil
  • 1 1/4 cup Blueberries
  • 1/3 – 1/2 cup Sucanat or Coconut Sugar (I use 1/3 cup)
  • 2 TSP Baking Powder
  • pinch of Himalayan salt


Method:

  1. In a medium-sized bowl add 1 TBSP Chia seeds and 1/2 cup water to it. Mix and let it sit to thicken for 20-30 minutes. Give it a mix every now and then in that time period.
  2. Preheat the oven to 400 F
  3. In a large bowl add flour, sugar, salt and baking powder. Mix well.
  4. Add the coconut oil and milk into the chia mixture. Combine well.
  5. Place the wet ingredients into the dry ingredients and mix well.
  6. Gently fold in the blueberries into the mixture.


blueberries


blueberry chia batter


7. Line the muffin tin with paper liners or grease the baking tin.

8. Fill the muffin tin evenly with the mixture and pop it into the preheated 400 F oven. Bake for about 20 – 25 minutes. I find that mine are done at 25 minutes but every oven varies.

9. Once baked let them cool off in the muffin tin or they can also transferred to a cooling rack to cool off. Place in an airtight container once they have cooled down.

Healthy and so simple to make … Enjoy!


Blueberry Chia Muffins


*For a glimpse into my foodie life follow me on Instagram ~  VeganMommyDee and Twitter at MommyDeeOf3 🙂


Coconut Overnight Spelt Flakes

I make my overnight spelt flakes/oats very often. It makes breakfast much easier in the morning when your in a rush! Instead of having to wait for your spelt flakes/oats to cook all you would have to do is heat them up! So fast & easy! I use medium-sized mason jars to make my overnight oats because I find it’s easier to heat up in the morning. Instead of transferring the mixture into a pot I just add the jar right into a small pot of boiling water for a couple of minutes. Sometimes I will scoop the warmed up spelt/oats into a bowl or a lot of times I eat it right from the jar! 🙂 You can’t get any easier than that right? In my recipe I use unsweetened milk, coconut shavings and almond butter because I want to keep everything sugar-free. I prefer not to add additional sugar other than the natural occurring sugar in the banana and optional berry or fruit topping. If you like things on the sweeter side you could use the sweetened coconut, milk and nut butter.

overnight breakfast

Coconut Overnight Spelt Flakes

You will need:

  • 1/3 Cup Spelt Flakes or Old fashion Oats
  • 1 1/4 cup Almond & Coconut unsweetened milk or milk of choice
  • 1 TBSP Cinnamon
  • 1 tsp of unsweetened sulfate free shredded coconut
  • 1 TBSP Chia seeds
  • 1 TBSP all natural unsweetened Almond Butter
  • 1/3 cup berries or chopped fruit (optional)
  • 1 medium-sized mashed banana
  • 1 TBSP chopped walnuts

Method

  1. Add 1/3 cup Spelt Flakes, Oats or a combination of both which is also really good.
  2. Mash 1 medium-sized banana with a fork in a small bowl.
  3. Throw in the 1 TBSP of cinnamon, chia seeds & 1 tsp shredded coconut.
  4. Add in the mashed banana and chopped walnuts and combine.

Coconut overnight spelt flakes

5. Next add in the 1 1/4 cup of milk

overnight coconut spelt flakes

6. Give it a good mix to combine, put the lid on and place it in the fridge overnight.

In the morning …

  • Put a small pot of water on to boil

Heating up the overnight spelt flakes

  • Place the jar right into the pot and heat it up for a couple of minutes.
  • Once it’s hot enough for your liking remove the jar from the water and your going to add the 1 TBSP of almond butter into the mixture.
  • Give it a good mix and you can add 1/3 cup fresh chopped fruit or berries into it as well if you like. I do! 🙂
  • Eat it right from the jar or transfer it into a bowl.

yummy breakfast cereal

ENJOY your healthy breakfast! 🙂

Healthy Strawberry Quinoa Bake

This is one of my most often made recipes at my house. LOVE it! It’s crazy fast and easy to prepare too! Everyone who has eaten it can’t believe it’s made with quinoa. SURE IS and it tastes soooo good!

I add 2 TBSP of maple syrup to my recipe below but you can add an extra one if you enjoy things more on the sweeter side. You could also substitute it for agave if you wanted. One of my favourite things to throw into this bake is protein packed hemp hearts because it adds a bit of a nutty flavor to the bake. I often eat this strawberry quinoa bake for breakfast. Hey why not? It’s full of super healthy ingredients so I feel good about enjoying this yummy treat in the morning. See healthy can taste fantastic!!! 🙂


A slice of Strawberry Quinoa bake


Ingredients:


  • 1 Cup Quinoa Flakes
  • 1 TSP Cinnamon (I sometimes add more though :))
  • 2-3 TBSP Hemp hearts
  • 1-2 TBSP Dried Coconut flesh (I use Coconut Manna by Nutiva)
  • 1/4 Cup melted Coconut Oil
  • 2 Cups chopped Strawberries
  • 2-3 TBSP Pure Maple Syrup
  • 3 TBSP Flaxmeal (ground flax seeds)
  • 1 Cup Unsweetened Almond Milk


Method:


1. Preheat oven to 350 F

2. Add 1 cup of quinoa flakes into a baking dish (I use a round glass pie plate).

3. Mix in the cinnamon, hemp hearts and flaxmeal.


Quinoa Bake


4. Next add the 2 cups of strawberries and the dried coconut flesh.


Strawberries


5. Pour in 2-3 TBSP’s of pure maple syrup and the 1/4 cup coconut oil and give it a good mix.

6. Even it out in the baking dish and pour 1 cup of unsweetened almond milk on top.

7. Pop into the oven for 35 minutes at 350

8. Once Baked and removed from the oven allow to fully cool before cutting because it needs to set! If your in a hurry like I am at times scoop it into a bowl and eat it hot in a bowl.


Enjoy!


Strawberry Quinia Bake


Banana Vegan Chip Muffins

My kids LOVE, LOVE, LOVE Banana Vegan Chip Muffins!!! I have many recipes that I use but this recipe is their favourite one! It’s very fast to make and they taste super yummy and moist. It’s loaded with ground flax seeds (flaxmeal) and even my very picky 6-year-old gives these muffins the thumbs up. By the way she doesn’t even like bananas and eats these muffins! I make these muffins and almost all my baking period with brown rice flour. It has many health benefits such as its rich in fiber, manganese, selenium, zinc, calcium and B vitamins. I also add healthy oats to these muffins but it would work with wheat germ as well. These muffins are made so often that when we don’t have them the kids ask me “mommy where are the muffins???” LOL  I’ve also made them without the vegan chocolate chips and they are still super good! I add in the chips to make the kids happy! I do however sometimes only add in 1/4 cup of them instead of the 1/3 cup and they actually notice! Then they ask me why there are less vegan chips in the batch of muffins when that happens. Sheesh!  This is why I put 1/3 cup in the recipe below! I also added a picture of them cooling off on the wire baking rack but sadly it’s not the greatest picture. Oh well you get the idea …

Yummy Banana Vegan Chip Muffins!

Yummy Banana Vegan Chip Muffins!


Banana Vegan Chip Muffins


Ingredients:

  • 3 Bananas, mashed
  • 1/4 cup coconut oil or oil of choice
  • 1 tsp pure vanilla extract
  • 3 TBSP ground flax (flaxmeal)
  • 6 TBSP water
  • 1/2 cup oats or wheat germ
  • 1/4 cup sucanat sugar or other sugar of choice
  • 1 cup brown rice flour
  • 2 tsp aluminum free baking powder
  • 3/4 cup almond milk (I use unsweetened)
  • 1/3 cup vegan chocolate chips

Tools:

  • 2 muffin tins
  • paper muffin liners
  • 2 medium-sized bowls

Method:

  1. Preheat oven to 400 F
  2. Place 3 TBSP of flaxmeal in a small bowl add add the 6 TBSP water to it. Mix well and set aside for a few minutes.
  3. With a fork mash 3 ripe bananas in a medium-sized bowl.
  4. add 1 tsp vanilla, 1/4 cup oil and 1/4 cup sugar to banana mixture. You can add more sugar if you like sweeter muffins but I think 1/4 cup is enough for us.
  5. In another medium-sized bowl add the 3/4 cup brown rice flour and oats.
  6. Add the baking powder to the flour mixture and combine well.
  7. Add the flaxmeal mixture into the wet ingredients and mix well.
  8. Next add the wet ingredients into the dry ingredients. Now add the 3/4 cup unsweetened almond milk. Combine.
  9. Toss in the vegan chips  and give it another mix.
  10. Line 1  12 muffin baking tin with paper liners and fill them half way for medium-sized muffins. Grab another muffin tin and place 4 more paper liners in it. Fill those suckers up too! You could also just do 12 larger muffins and bake them for 25-27 minutes. We prefer medium-sized muffins however.
  11. Pop them into a 400 F oven for 23-25 minutes.
  • Once they are baked I let them cool off inside the tins for about 5 minutes. Then I transfer them to a wire baking rack and let them cool completely before placing them into a air tight container.

*Makes 16 medium-sized muffins or 12 large muffins*

Enjoy! 🙂

Healthy Oat Bars

Here is my favourite recipe for healthy oat bars! I love this recipe that I came up with because it’s made with healthy dates and prunes. Dates have iron, calcium and fiber in them as well as countless other healthy benefits. Prunes also have fiber in them as well as vitamin C, A, K and they are said to be a good anti colorectal cancer food choice. I really like how the dates and prunes act as a sweetening agent in the recipe! I’ve added the option of adding pure maple syrup to them as well if desired. I’ve made them with and without the maple syrup and both ways taste really good to me. The maple syrup adds a bit of extra sweetness and of course a tasty kick to the bars though. I love oat bars because they are easy to make and can be a great snack to eat on the go! Another bonus is that this recipe is flour free too!

|**The bars do have almonds in them but you can make them nut free if allergies are a concern. **


Healthy Oat Bars


Ingredients:

  • 2 Cups Gluten Free Oats
  • 1 TBSP Cinnamon
  • 3/4 Cup Cranberries or other dried sulfate free fruit of choice
  • 3 TBSP Flaxmeal
  • 1/2 cup finely chopped almonds
  • 1/2 tsp – 1 tsp vanilla extract
  • 2 TBSP Pure Maple Syrup (optional)
  • 12 Dates (I soak mine over night to make them easier
  • 6 Prunes
  • 1/3 cup warm water
  • 1/3 cup pumpkin seeds or you can substitute another seed


You will also need these simple items …

  1. Food Prosser or high-powered blender
  2.  You will need a baking pan. Depth will depend on how thick you want your bars to be.
  3. Parchment paper to line your baking dish or coconut oil to oil your dish with.


Method:

  1. Preheat oven to 350
  2. In a food processor add the dates and prunes
  3. Add 1/3 cup warm water into the food processor and process until smooth. Add more water if needed until it’s well combined. Also add the vanilla extract and combine all ingredients well.
  4. In a large bowl add the oats, cinnamon, pumpkin seeds and flaxmeal.
  5. Add the cranberries or other dry fruit of choice & finely chopped almonds to dry mixture. Combine well.
  6. Add the date & prune mixture into the dry ingredients. Make sure to mix everything up well.
  7. If you’re adding in the maple syrup then toss it in now and combine well.
  8. Line your baking pan with parchment paper or oil it well
  9. Add the mixture to the baking pan and even it out well.
  10. Bake for 3o minutes

*Let rest until cooled off before cutting into bars*


Enjoy them! I know I do & they don’t last long at all! 🙂


Date Cranberry bars

Healthy Vegan Cranberry Granola Bars

I love granola bars and I also love giving them to my kids as a snack. I don’t however like the fact that the store-bought types are loaded with refined sugar! I’ve been playing around with different combinations of ingredients and making my own homemade granola bars. In this recipe I use pure Canadian maple syrup as my sweetener. Pure maple syrup is low on the glycemic index and contains manganese and iron which a total plus! 🙂 These bars are protein packed and contain healthy omega! Hurrah! I even eat them for breakfast sometimes when I’m on the go. Here is my easy and healthy recipe for vegan granola bars …

Easy & Healthy to whip up Granola Bars1

Healthy Vegan Cranberry Granola Bars

Ingredients:

  • 2 cups oats
  • 3/4 cup sulfur free dried cranberries
  • 3 TBSP raw pumpkin seeds
  • 1/3 cup flaxmeal
  • 2 TBSP vegan protein powder (I used vanilla brown rice protein powder)
  • 1 TBSP cinnamon
  • 1/4 cup melted organic coconut oil
  • 1 TBSP natural almond or peanut butter
  • 3 TBSP brown rice flour
  • 1/2 cup pure maple syrup
  • 2 TBSP of flaxmeal w/ 3 TBSP warm water
  • 1/4 cup chopped almonds or nut of choice

* You will need a baking pan. The size of the pan will vary depending on how thick you want your granola bars to be*

* Depending on how sweet you like your baked goods, you may want to add more maple syrup to your granola bars. I don’t feel the need for the extra sweetness so I only use 1/2 cup in my recipe.

Super yummy & healthy granola bars!
 

Method:

  1. Preheat oven to 350 F
  2. In a large bowl add oats, brown rice flour, vegan protein powder, cinnamon, and 1/3 cup flaxmeal. Mix well.
  3. In a small bowl add the 2 TBSP of flaxmeal with 3 TBSP of warm water. Mix and let it sit for a couple of minutes to thicken.
  4. Chop up nuts or process them. Toss them into the mixture.
  5. Add cranberries and pumpkin seeds and mix.
  6. In a medium-sized bowl add the almond butter, maple syrup and coconut oil. Mix well.
  7. Add the wet ingredients into the dry and combine well.
  8. Use vegan butter/coconut oil to grease your pan or cut parchment paper to fit your baking dish.
  9. Add the mixture to the baking pan and even out. Push it down with a spoon to make sure it’s tightly packed in.
  10. Pop into the oven for 35-40 minutes at 350 F.
  • Once you take it out of the oven let it cool off in the baking dish before you cut it up.
  • When the granola mixture has cooled off you can remove the parchment paper and place on the counter. Cut the granola up as desired and place in an airtight container. If you didn’t use the parchment paper just cut it up right in the baking dish. You could also individually wrap them up so you have them ready to go for breakfast on the go or to toss in your lunchbag or purse for a snack.

ENJOY! 🙂

Easy to make healthy granola bars!

Easy to make healthy granola bars!

Blueberry Quinoa cake

I’ve been on a bit of an organic blueberry kick lately! It seems that somehow I’m always throwing blueberries into my baking these days! These antioxidant rich berries have so many health benefits so I feel good about incorporating them into my baked goods. They also help to boost your immune system which is especially important to me during these wretched winter months. [insert rant] … Yes I HATE WINTER with a bloody passion! Stupid cold never-ending months of torture!

Ok I’m done now. 🙂

As I was saying blueberries have many health benefits such as aiding in heart health, brain function, helps reduce belly fat, helps with constipation and digestion and they are known for being natures anti-depressant!

This recipe is super easy as are all my recipes. I’m a mom of three and I don’t have the time to make fussy recipes! I’m also a strong believer in the fact that less is more when preparing food! This blueberry quinoa cake is also great for breakfast despite the fact that I’m calling it “cake”. Another added bonus is that it is flour free, so our waistlines are thanking us!


BLUEBERRY QUINOA CAKE


Ingredients:

  • 1 1/2 cup organic blueberries
  • 1 cup quinoa flakes
  • 1 cup almond or soy milk
  • 1 heaping TBSP of cinnamon
  • 1/4 cup melted coconut oil
  • 1/4 cup pure maple syrup or agave
  • 3 heaping TBSP of ground flax seeds (flaxmeal)
  • handful of chopped nuts of choice or raw pumpkin seeds


Method:

  1. In a medium-sized baking dish combine quinoa flakes and cinnamon
  2. Add the flaxmeal and blueberries, mix
  3. Next add the melted coconut oil and the maple syrup or agave. Combine well. 
  4. Throw in a handful of chopped nuts or my favourite raw pumpkin seeds
  5. Add the milk and give it one last mix to combine all the ingredients well.


*Pop it into the oven at 350 F for 35-40 minutes. Let it cool for a while so it can set properly and you can slice it up.


NOTE: If you want your cake to take on more of a bright purple colour instead of having all the blueberries in tact like mine in the pictures you can give it a mix at the 20 minutes mark. The blueberries will be super soft and will release their beautiful bright colour into your cake. I’ve made it both ways and either way it’s yummy!


Enjoy!


Healthy protein & omega rich cake. Flour free!

Healthy protein & omega rich cake. Flour free!


Healthy & simple blueberry & quinoa cake!

Healthy & simple blueberry & quinoa cake!


Organic Apple Quinoa Bake

Here at my house I have a bit of a obsession with making apple oat bakes. I always have organic gala apples and oats in the house! Those are staple food items in my home. My kids are obsessed with gala apples so that’s why I stick to buying that type. Apple bakes are great when you wanna put together something quickly. The beauty of a bake is that you throw it into the oven and you don’t have to fuss over it. I wanted another option that was even healthier so I decided to use quinoa flakes in my recipe. It’s also a wheat-free/gluten-free grain option! There are so many benefits to including quinoa to your diet! It’s packed with a protein, super low in calories, antioxidants, magnesium, phosphorus, calcium, and has anti inflammatory benefits as well. Here is the incredibly easy recipe for my organic apple quinoa bake …

ORGANIC APPLE QUINOA BAKE

Ingredients:

  • 2 large organic apples, chopped up and leave the skin on. Everyone needs more fiber in their diet!
  • 1 1/4 cup organic quinoa flakes
  • 1 heaping TBSP of cinnamon … another obsession of mine 🙂
  • 1/3 cup melted coconut oil
  • 1/3 cup apple cider vinegar
  • 1/4-1/3 cup pure maple syrup (1/4 cup is what I use)
  • 1/4 cup pumpkin seeds

Notes:

* You will need a medium-sized baking dish*

*You can add more quinoa flakes to your bake if you desire. I don’t because I like to keep apples as the star of the show.

*Makes 4 servings*

Method:

  1. Add the quinoa and cinnamon into the baking dish, mix
  2. Chop up the apples and add them into the baking dish
  3. Pour the apple cider vinegar to the mixture and give it a good mix.
  4. Pour the coconut oil on the mixture and combine.
  5. Next add the maple syrup. Depending on how sweet you want your apple bake to be you can add between 1/4 – 1/3 cup maple syrup.
  6. Toss in the raw pumpkin seeds
  7. Even out in the baking dish and bake for 20-25 minutes at 350 F

Easy, Easy, Easy! Enjoy as a dessert or snack! You could even spoon this bake on top of coconut ice cream with a little drizzle of maple syrup and top with walnuts or pecans. YUM!

Simple Apple Quinoa Bake